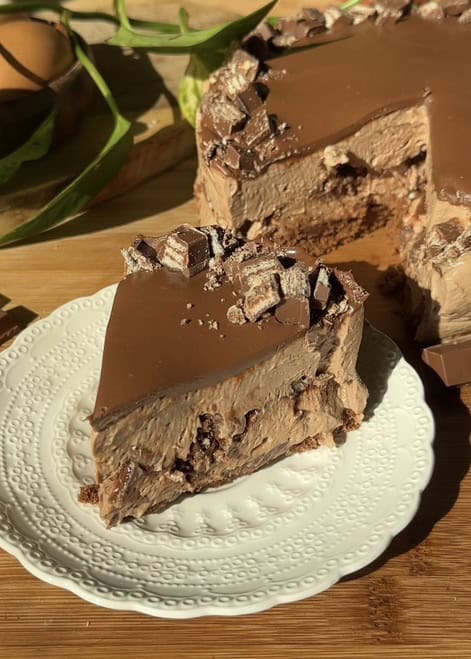
This Nutella Kinder Bueno No Bake Cheesecake is the ultimate indulgent dessert that’s unbelievably easy to make! This easy Nutella cheesecake recipe features a smooth, silky, and creamy filling that melts in your mouth with every bite.
Loaded with Nutella and Kinder Bueno, it’s the perfect no-bake treat for any occasion.

The texture is luxuriously soft and decadent, making it a guaranteed crowd-pleaser—whether you’re serving it at a party, special celebration, or simply treating yourself.
Everyone will fall in love with this irresistible combination of chocolate hazelnut goodness and creamy cheesecake bliss.
Nutella Kinder Bueno Cheesecake is the ultimate treat for any special occasion or celebration.
With a rich, buttery crust, a silky smooth Nutella cheesecake filling, and a luscious topping of Nutella and white Kinder Bueno pieces, this no-bake dessert is as stunning as it is delicious.
- Each bite melts in your mouth, delivering a perfect balance of creamy texture and chocolate hazelnut flavor.
- This decadent chocolate hazelnut dessert is easy to make and guaranteed to impress

If you love this Nutella Kinder Bueno Cheesecake, be sure to check out the rest of our cheesecake collection! We have a variety of no-bake cheesecake recipes that are just as easy and indulgent, along with irresistible baked cheesecake recipes for those who enjoy classic, oven-baked desserts.

Nutella Kinder Bueno Cheesecake

Why You’ll Love This Recipe
Here are my favorite reasons on why you’ll love this no bake Kinder Bueno cheesecake recipe.
⭑ Unmatched Texture: With its smooth, silky, and melt-in-your-mouth Nutella filling, this cheesecake delivers a creamy texture that’s hard to beat.
❀ Fuss-Free Method: No oven needed! This no bake recipe is incredibly easy to make, perfect for beginners or busy days when you want a showstopping dessert without the effort.
⭑ Irresistible Flavor: The combination of Nutella and white Kinder Bueno creates a rich, chocolate hazelnut flavor that’s both indulgent and unique.
❀ Stunning Presentation: Decorated with Nutella and crunchy Kinder Bueno pieces, this cheesecake doesn’t just taste amazing—it looks like it came straight from a bakery.

Grab These Ingredients
- Biscuits: These create the base of the crust, offering a slightly sweet crunch that holds the creamy filling perfectly once chilled.
- Butter: Melted butter binds the biscuit crumbs together, creating a firm, buttery crust that slices cleanly and holds its shape.
- Kinder Bueno Spread: Mixed into the crust for a rich chocolate hazelnut flavor that takes it to the next level. Use code archersfood at prozis for an exclusive discount.
- Powdered Sugar: Sweetens the filling without affecting its smooth, creamy consistency. It dissolves easily, giving you a silky texture throughout.
- Cream Cheese: The heart of the cheesecake filling. It provides a rich, tangy base and that classic creamy texture everyone loves in a cheesecake.
- Heavy Whipping Cream (35%): Whipped into soft peaks and folded into the filling to create a light, airy texture that balances the richness of the cream cheese and Nutella.
- Nutella: Blended into the filling for a deep chocolate hazelnut flavor, and also drizzled on top for an indulgent, glossy finish.
- White Kinder Bueno: Used as a topping for added texture and visual appeal. It adds a creamy crunch and pairs beautifully with the Nutella.
Special Tools to Make a Nutella Kinder Bueno No Bake Cheesecake
- Mixing bowls: Essential for combining ingredients at different stages—such as mixing the crust, preparing the cheesecake filling, and whipping the cream.
- Food scale: Used for accurately measuring all ingredients by weight, ensuring consistency and precision—especially important in no-bake desserts.
- Spatula: Perfect for folding whipped cream into the filling gently to maintain its airy texture, and for scraping down the sides of bowls to avoid waste.
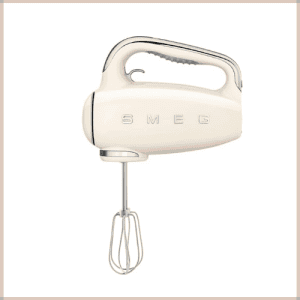
- Electric hand mixer or whisk: Used specifically to whip the heavy cream until soft peaks form, creating the light, airy texture needed for the cheesecake filling.
- Springform pan: Ideal for no-bake cheesecakes. The removable sides allow you to release the cheesecake cleanly without damaging the crust or filling.
- Food processor: Used to crush the biscuits evenly for the crust, ensuring a fine, uniform crumb that binds well when mixed with butter and spread.

How To Make Kinder Bueno Cheesecake
Crust
Place all the biscuits in a food processor bowl—this is a crucial step for creating the perfect crispy Kinder Bueno crust.
For this recipe, we aimed to use enough biscuits to reach the top of the crust layer, giving it extra thickness and crunch.
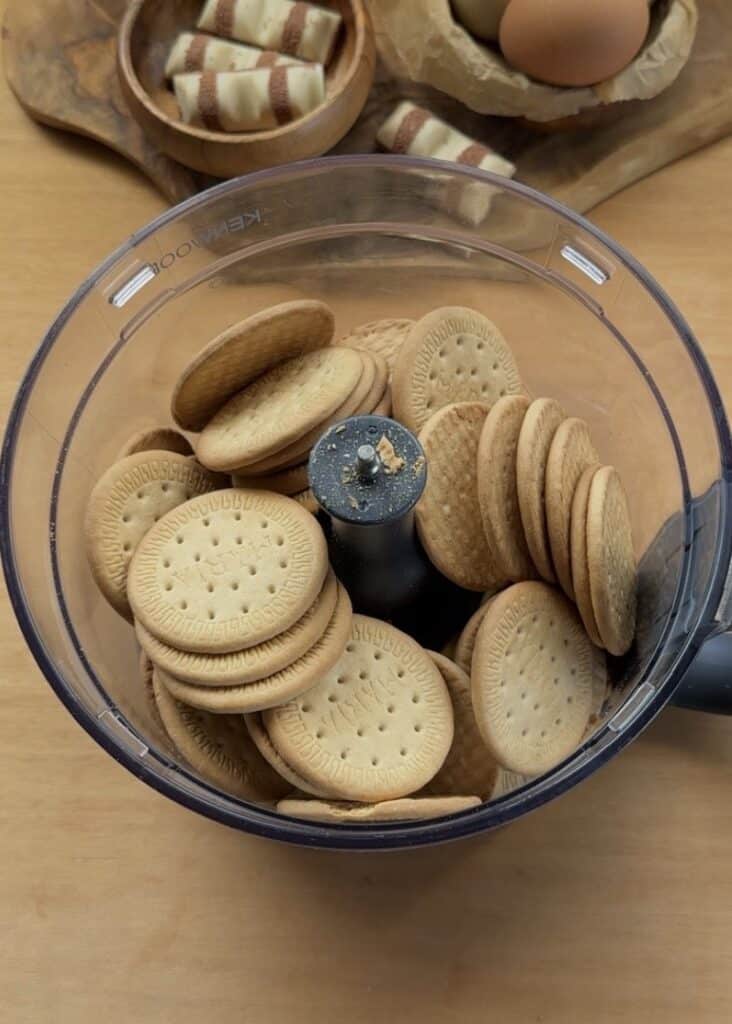
However, if you prefer a thinner base, feel free to use fewer biscuits—just enough to cover the bottom of your pan. Once the biscuits are in the food processor bowl, pulse them until they become fine, uniform crumbs.
This fine texture is essential for the crumbs to bind well with the butter and Kinder Bueno spread, resulting in a crispy, flavorful crust that holds up beautifully beneath the creamy cheesecake filling.

Now, pour the finely crushed biscuit crumbs into a mixing bowl.
To create the signature crispy crust that sets this kinder bueno dessert recipe apart, add a generous amount of Kinder Bueno spread.
(Don’t forget, you can get a discount on Kinder spread using the code archersfood at Prozis!)

Next, add melted butter to the bowl. The butter acts as the binding agent, helping the crumbs stick together while adding a rich, buttery taste that perfectly complements the Nutella cheesecake filling.
Mix everything thoroughly until the texture resembles wet sand—moist enough to hold its shape when pressed but still crumbly.
This perfect balance ensures your crust will be firm, flavorful, and delightfully crispy once set.

crust
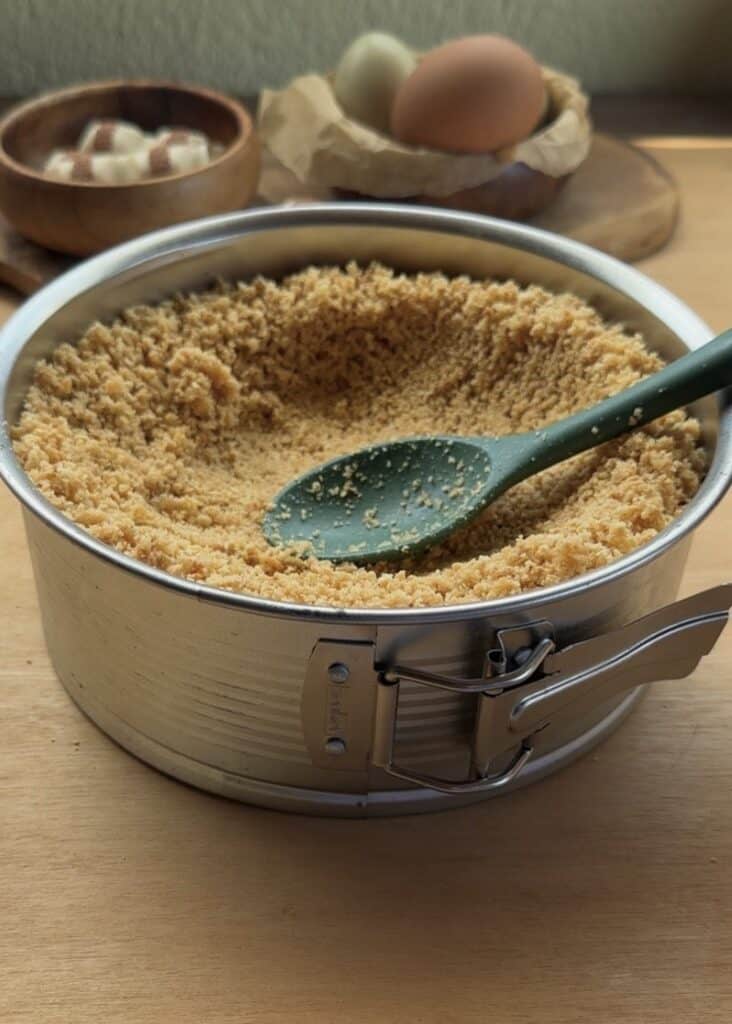
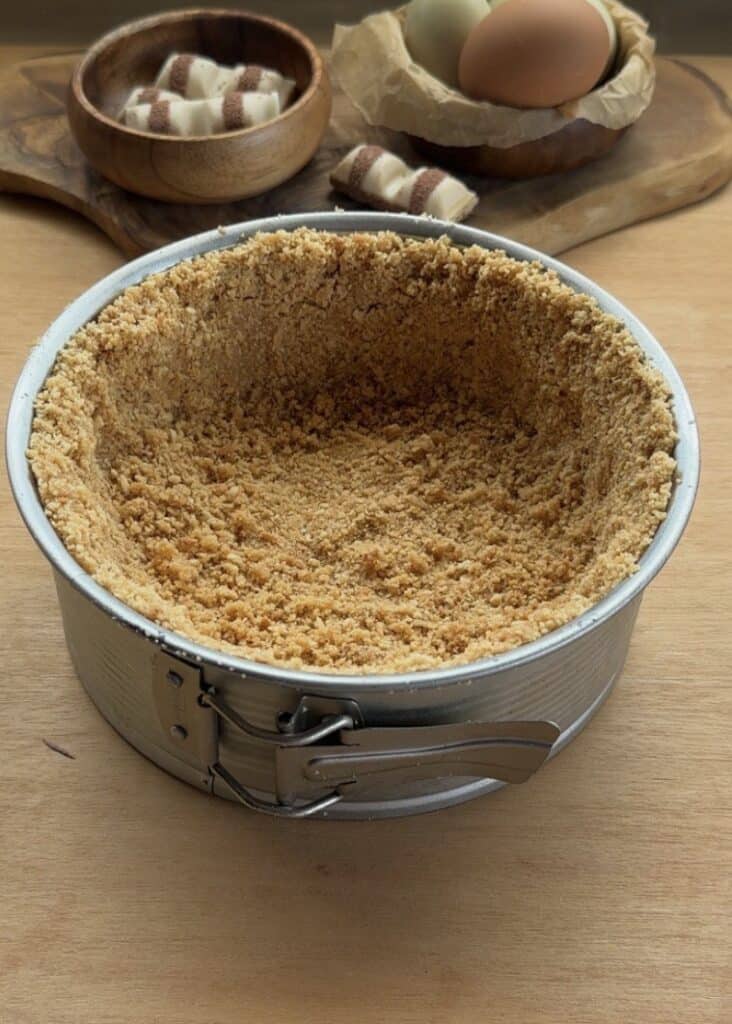
Now it’s time to transfer the biscuit mixture into your springform pan.
Start by pressing the crumbs firmly against the edges of the pan to create a nice, even border, then press the rest down flat on the bottom to form a solid base.
This technique ensures your crispy Kinder Bueno crust has structure and holds the cheesecake filling perfectly. Once pressed evenly, place the pan in the freezer.
cheesecake filling
Now, let’s move on to creating the silky Nutella cheesecake filling.
Begin by working the cream cheese with a spatula until it becomes smooth and creamy.
It’s essential that the cream cheese is at room temperature for this step, as this makes it much easier to blend and prevents lumps in your filling.
Using a spatula to gently soften and work the cream cheese helps achieve that ultra-smooth, velvety texture that’s key to a decadent Nutella Kinder Bueno cheesecake.

Now, for this creamy no bake cheesecake, we’re going to add the Nutella—or any chocolate hazelnut spread you prefer; there’s no need to stick to a specific brand.
It’s important to gently fold the Nutella into the cream cheese to maintain that silky, smooth texture.
Avoid using a whisk during this step, as whisking can incorporate too much air and affect the cheesecake’s ability to set properly, resulting in a less stable filling. Instead, use a spatula to carefully blend the Nutella in.

Mix carefully using a spatula until everything is fully incorporated—the cream cheese and chocolate hazelnut spread should blend seamlessly into a smooth, uniform mixture.
whip the cream
For this next step in your best no bake Kinder dessert, we’re going to whip the cream with the sugar.
This whipped cream is essential for creating that light, airy texture while keeping the cheesecake filling rich and creamy.
Be sure to use a clean, completely dry mixing bowlany moisture or residue can prevent the cream from whipping properly.
Whip the heavy cream and powdered sugar together until you reach soft peaks
Gently incorporate the whipped cream into the Nutella and cream cheese mixture. Use a spatula to fold it in carefully, working in batches if needed.

Fold just until no streaks remain and the filling is beautifully uniform, silky, and creamy. This careful technique ensures a perfectly set, melt-in-your-mouth result that looks as good as it tastes.

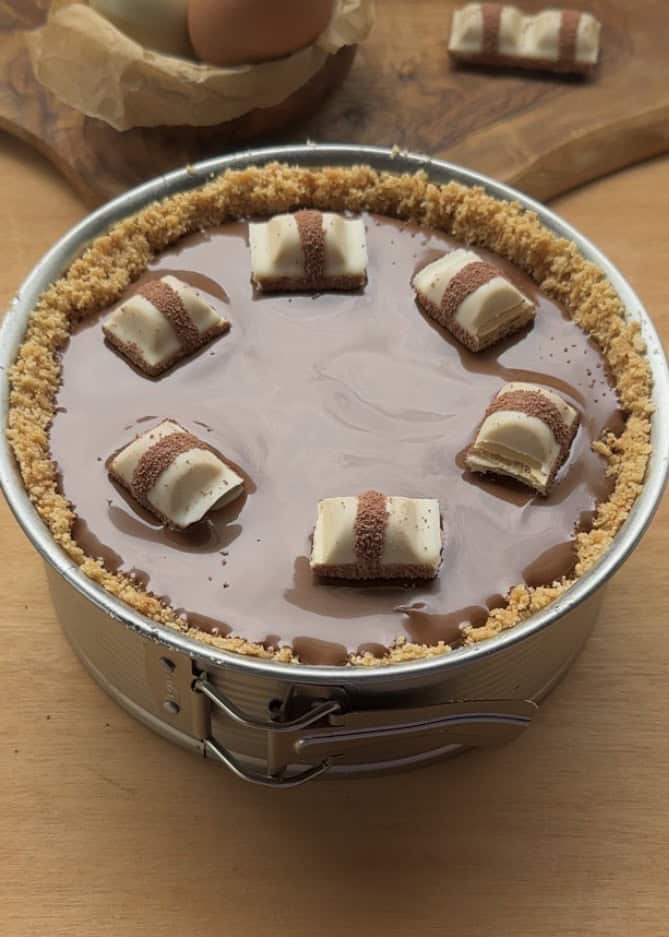
Now, pour the luscious cheesecake filling into your prepared springform pan, right over the chilled crispy Kinder Bueno crust.
Use a spatula to gently spread the mixture evenly and smooth out the top for a clean, level finish
Refrigerate the cheesecake for at least 8 hours, or ideally overnight, for the best results.
This slow chill time allows the filling to set, giving your creamy kinder bueno cheesecake without oven its clean slices.
decorate
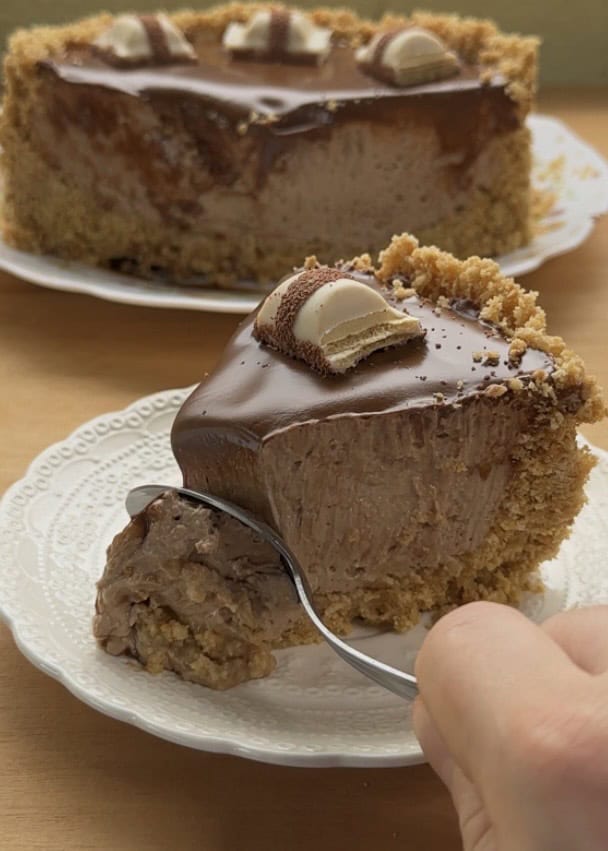
Now comes the fun part, decorating your chilled no bake chocolate hazelnut cheesecake.
Start by melting some Nutella in the microwave for a few seconds until it’s pourable but still thick and glossy.
Pour it generously over the top, then gently tilt and rotate the pan to let the Nutella cover the surface.
Don’t worry about perfection, just aim for a beautiful, flowing layer.


Once fully chilled and decorated, carefully release the cheesecake from the springform pan. Use a sharp knife to slice clean portions—wiping the blade between cuts helps keep each slice neat. Then simply serve and enjoy!
Print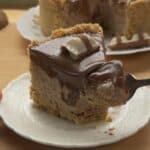
Nutella Kinder Bueno No Bake Cheesecake
- Prep Time: 30 min
- Refrigerate time: 8h to overnight
- Total Time: 8h 30 minutes
- Yield: 10
- Method: no bake
- Cuisine: american
Description
This no bake Nutella Kinder Bueno cheesecake is a dreamy dessert that combines a crispy Kinder Bueno crust, a smooth and creamy Nutella filling, and a glossy Nutella topping finished with pieces of white Kinder Bueno
Ingredients
Crust
- 350 grams biscuits
- 90 grams melted butter
- 2 tablespoons kinder bueno spread (or Nutella)
cheesecake filling
- 400 grams cream cheese
- 100 grams powdered sugar
- 200 grams heavy whipping cream (35%)
- 150 grams Nutella
decorate
- 6 kinder bueno pieces
- 100 grams melted nutella
Instructions
-
Place all the biscuits in a food processor bowl and blend until you get fine crumbs.
-
Pour the crumbs into a bowl, add the Kinder Bueno spread and melted butter, and mix until the texture resembles wet sand.
-
Pour the crust mixture into a springform pan. Press the crumbs firmly, bringing the crust up to the edges first, then pressing into the base. Place it in the freezer while you prepare the filling.
-
In a mixing bowl, work the room temperature cream cheese with a spatula until creamy.
-
Add the Nutella and mix carefully with a spatula until fully incorporated and the mixture has a smooth chocolate color.
-
In a clean, dry mixing bowl, whip the heavy cream and powdered sugar with an electric hand mixer until soft peaks form.
-
Gently fold the whipped cream into the Nutella cream cheese mixture, being careful not to overmix.
-
Pour the cheesecake filling over the crust in the springform pan and smooth out the top.
-
Refrigerate for at least 8 hours or overnight.
-
Melt Nutella in the microwave and pour it over the top of the cheesecake. Tilt the pan gently to evenly coat the surface.
-
Decorate the edges with pieces of Kinder Bueno.
-
Slice and serve.


Notes
- Use heavy whipping cream with 35% fat; anything less won’t whip properly.
- Whip the cream only until soft peaks form to avoid overwhipping and curdling
- Make sure the bowl is dry and cold to help the cream whip correctly.
- Avoid using a whisk when mixing the cream cheese with Nutella to prevent a melted or runny texture.
- Do not overmix the cheesecake mixture to prevent curdling and maintain a smooth, creamy consistency.
Best Tips To Make a Kinder Cheesecake
- Use heavy whipping cream with 35% fat; anything less won’t whip properly.
- Whip the cream only until soft peaks form to avoid overwhipping and curdling.
- Make sure the bowl is dry and cold to help the cream whip correctly.
- Avoid using a whisk when mixing the cream cheese with Nutella to prevent a melted or runny texture.
- Do not overmix the cheesecake mixture to prevent curdling and maintain a smooth, creamy consistency.

Serving Suggestion
Start by generously spreading a smooth layer of Nutella over the top of the chilled cheesecake, creating a glossy, rich finish that complements the creamy filling.
Then, decorate the edges with pieces of Kinder Bueno—use as many as you like to create an inviting border of crunchy, chocolate-hazelnut goodness.
To add an extra touch of texture and elegance, sprinkle the tiny crunchy bits that coat the Kinder Bueno on the sides; these add a delightful crunch and visual appeal, making each slice even more irresistible.
FAQ about: Nutella Kinder Bueno no bake cheesecake
Yes! This easy no bake Nutella cheesecake recipe actually tastes better after chilling overnight. Refrigerate it for at least 8 hours to achieve the perfect silky, creamy texture.
To get that perfect crispy Kinder Bueno crust, make sure to blend the biscuits finely and mix thoroughly with the Kinder Bueno spread and melted butter before pressing firmly into the pan.
Using a whisk can change the texture of the cream cheese mixture, making it too runny and less stable when set. For the best texture in this no bake Kinder Bueno cheesecake, use a spatula to gently fold ingredients.
ARCHER'S FOOD
Easy and delicious recipes