This no-bake Biscoff cheesecake was crafted from scratch, and we couldn’t believe how incredible it turned out! What started as an experiment quickly became one of our favorite no-bake dessert recipes. With its creamy texture, rich Biscoff flavor, and effortless preparation, this cheesecake is a must-try for anyone who loves easy Biscoff desserts. Whether you’re a fan of the iconic Lotus Biscoff spread or just looking for a quick yet indulgent treat, this recipe is guaranteed to impress. Plus, it’s so simple to make, you’ll be whipping it up for every occasion!

What are Biscoff cookies?
Biscoff cookies, also known as speculoos, are caramelized, spiced shortcrust biscuits originally from Belgium. They’re known for their signature crunch, warm cinnamon flavor, and slight caramel sweetness. Often enjoyed with coffee or tea, these cookies are a beloved treat worldwide and serve as the base for the iconic Lotus Biscoff spread. Their unique flavor makes them perfect for desserts like Biscoff cheesecakes, no-bake Biscoff treats, and other indulgent creations!
What is Biscoff spread
Biscoff spread, also known as cookie butter, is a creamy or crunchy spread made from crushed Biscoff cookies blended with oils and sugar to create a rich, caramel-flavored paste. It has the same warm cinnamon and caramel notes as the cookies but in a spreadable form.
This versatile ingredient is perfect for spreading on toast, swirling into desserts like no-bake Biscoff cheesecake, or using in Biscoff desserts for added flavor.
You can buy Biscoff spread at most major grocery stores, in the spreads or international foods aisle. It’s also widely available online on platforms like Amazon, Walmart, or specialty food stores. For those in Europe, it’s commonly found in supermarkets and Amazon.

Equipment you’ll need to make a no bake Biscoff cheesecake
- Springform pan – for assembling and removing the cheesecake easily.
- Food processor or rolling pin – for crushing the Biscoff biscuits into fine crumbs.
- Mixing bowls – to combine ingredients for the custard and other components.
- Whisk – for mixing the egg yolks with the cornstarch and whisking the custard mixture.
- Saucepan – for heating the milk, sugar, and cream cheese to create the custard.
- Spatula – for stirring and scraping the sides of the bowl and pot.
- Measuring spoons and cups or kitchen scale – for accurately measuring ingredients like sugar, cornstarch, and Biscoff spread.
- Sifter – to sift the cornstarch if needed to prevent clumps.
Why you should make this No bake Biscoff cheesecake
This no bake Biscoff cheesecake is a dessert you’ll fall in love with at first bite. It’s rich, creamy, and packed with the warm, caramelized flavor of Biscoff cookies and spread. Whether you’re a cheesecake enthusiast or a cookie butter fan, this recipe is perfect for satisfying your sweet tooth.
It’s incredibly easy to make, no oven required, which makes it ideal for beginners or anyone short on time. This cheesecake is a show-stopper for gatherings, impressing guests with its luscious texture and indulgent taste. Plus, the recipe is highly versatile, you can add extra cookie layers, a caramel drizzle, or even Biscoff crumbs for a decorative touch.
This dessert isn’t just delicious, it’s the perfect combination of simplicity and elegance, making it a must-try for every dessert lover!

How to refrigerate a no bake cheesecake
Properly refrigerating your no bake Biscoff cheesecake is essential to achieve its creamy and firm texture. After assembling the cheesecake, cover it with plastic wrap or aluminum foil to prevent it from absorbing any fridge odors. Place it in the refrigerator for at least 6 hours, but ideally overnight, for the best results.
This chilling time allows the creamy filling to set perfectly and ensures the Biscoff crust holds together. If you have leftovers, store them in an airtight container to keep the cheesecake fresh and delicious for up to 3–4 days. This step is crucial for maintaining the rich, indulgent flavor and smooth texture of your Biscoff no bake cheesecake.
Can you freeze a No bake Biscoff cheesecake?
Yes, you can freeze a no-bake Biscoff cheesecake, making it a convenient option to prepare in advance! To freeze, ensure the cheesecake has fully set in the refrigerator first. Once set, remove it from the pan (if possible), then wrap it tightly with plastic wrap, followed by a layer of aluminum foil to prevent freezer burn. If you want to keep it in the pan, cover the pan with both layers instead.
For added protection, place the wrapped cheesecake in an airtight container. This will preserve its creamy texture and prevent any odors from the freezer from affecting its taste. You can freeze your Biscoff cheesecake for up to 1–2 months.
When ready to enjoy, transfer the cheesecake to the fridge and allow it to thaw overnight. Avoid thawing at room temperature, as this may affect the consistency of the filling. For the best flavor and texture, serve it slightly chilled and enjoy this indulgent Biscoff dessert!

Variations on this Biscoff no bake cheesecake
– Oreo: For a delicious twist, create an Oreo cheesecake by swapping out the Biscoff cookies for Oreo biscuits to make the base. For the filling, keep the rich and creamy texture with cream cheese, and mix in crushed Oreos for that signature flavor. The addition of crushed Oreos will add extra crunch and a chocolatey richness that pairs perfectly with the smoothness of the cheesecake.
– Berries: To create a fruit-flavored no-bake cheesecake, blend about 250 grams of fresh raspberries or strawberries into a puree. Once the fruit has been blended, gently fold it into the cheesecake mixture after the milk mixture has been boiled. The sweet-tart fruit adds a refreshing contrast to the creaminess of the filling, making for a deliciously tangy variation that is perfect for summer.
– Lemon: For a tangy lemon cheesecake, you’ll need the juice of 4 fresh lemons. Add up to 230 grams of sugar for sweetness. Instead of using 3 1/2 gelatin sheets, increase it to 4 for a firmer texture. Combine the lemon juice with cornstarch and eggs, and cook the mixture until it thickens before adding it to the cream cheese filling. The zesty lemon flavor complements the creamy filling, creating a light and refreshing dessert that’s perfect for any occasion.
Pictures of the process of making a no bake Biscoff cheesecake


Common questions on how to make a no bake Biscoff cheesecake
What is a no-bake Biscoff cheesecake?
A no-bake Biscoff cheesecake is a creamy dessert made with a Biscoff cookie crust and a smooth, no-bake filling. It uses Biscoff spread and cream cheese to create a rich, flavorful filling without the need for an oven. It’s a simple and quick dessert that’s perfect for any occasion.
How long does it take to make a no-bake Biscoff cheesecake?
This no-bake Biscoff cheesecake typically takes about 30 minutes to prepare, followed by refrigeration for several hours or overnight to allow the cheesecake to set properly.
What can I use as a substitute for Biscoff spread in this cheesecake?
If you don’t have Biscoff spread, you can substitute it with speculoos spread, cookie butter, or peanut butter. Keep in mind that the flavor will vary, but these alternatives still provide a creamy and spreadable texture.
Can I use different kinds of cookies for the crust?
Absolutely! While Biscoff cookies are ideal, you can use graham crackers, digestive biscuits, or even Oreo cookies as alternatives to create a cookie crust for your no-bake cheesecake.
Things to do before preparing this no bake Biscoff cheesecake:
– Gather all the ingredients. Before you begin, make sure you have all the ingredients needed for the no-bake Biscoff cheesecake. Having everything ready will ensure a smooth preparation process.
– Before you start preparing your no-bake Biscoff cheesecake, make sure you measure all the ingredients carefully for the best results.
– Prepare your pan, line your cheesecake pan with parchment paper or lightly grease it. This will help ensure the cheesecake is easy to remove once it has set. You could also use a springform pan for easy release.
– Soften the cream cheese, allow your cream cheese to soften at room temperature for about 30 minutes before starting. This makes it easier to mix and results in a smoother filling for your cheesecake.
– Ensure you have a clean, clear workspace, free from distractions. This will make it easier to manage the preparation steps and keep everything organized.
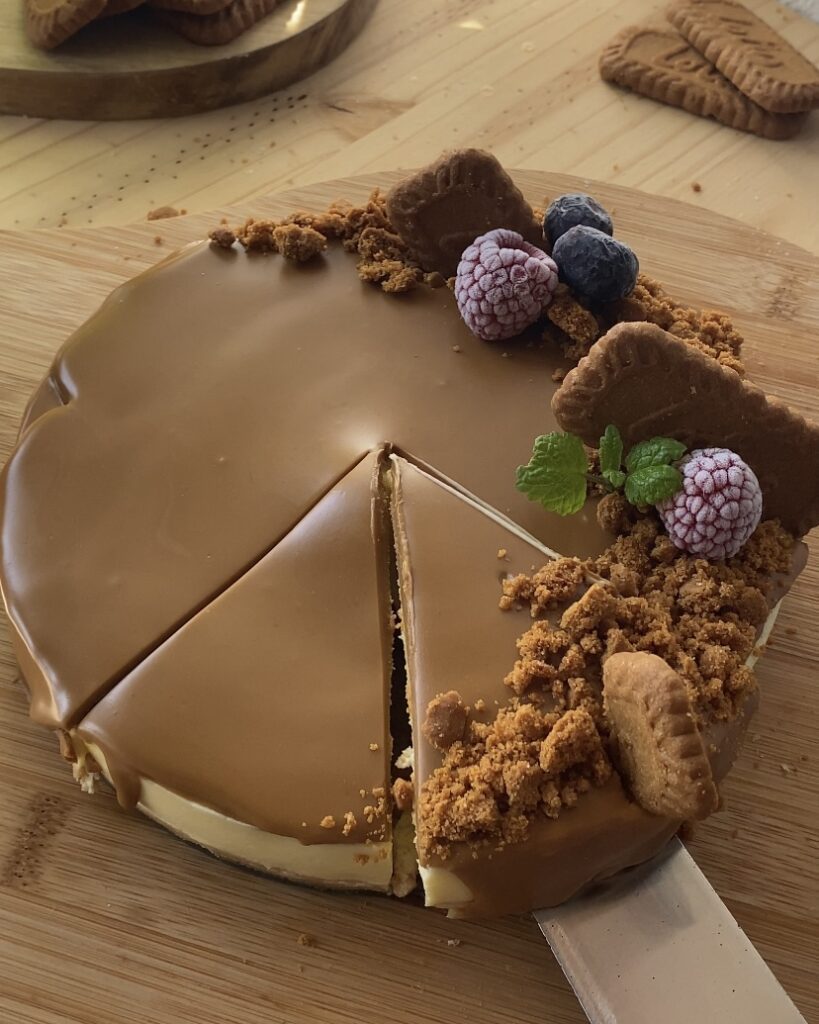
Recipe to make no bake Biscoff cheesecake
Recipe in cups and grams. You can find the cup measurements in the printable recipe scrolling down at the end.
Ingredients
crust
- 125 grams lotus biscoff cookies
- 45 grams melted butter
filling
- 325 grams of cream cheese
- 3 egg yolks
- 300 grams of milk
- 170 grams of sugar
- 3 1/2 gelatin sheets
- 1 tablespoon of cornstarch
decorate
- 150 grams lotus biscoff spread
- 5 Biscoff biscuits
step by step: Biscoff no bake cheesecake
1) step one, make the crust
Start by crushing the Biscoff biscuits into fine crumbs. You can do this by either placing the biscuits in a zip-top bag and using a rolling pin to crush them, or by using a food processor for a quicker result. Once the biscuits are crushed, transfer the crumbs to a bowl.
Next, melt some butter until it’s completely liquid. Pour the melted butter into the crushed Biscoff biscuits and mix well until the crumbs are evenly coated. The butter will help bind the crumbs together and form a sturdy crust.
Now, transfer the mixture into a prepared pan. Press the mixture down firmly into the bottom of the pan to form an even layer. Use the back of a spoon or a flat object to press the crust into place. Once it’s pressed, place the pan in the fridge for at least 30 minutes to let the crust set and firm up.


2) step two, prepare the custard base
In a medium-sized pot, combine the milk, sugar, and cream cheese. Stir the ingredients together until the cream cheese starts to soften and mix with the milk and sugar. Place the pot over medium heat and bring the mixture to a boil, stirring occasionally to ensure the ingredients don’t stick to the bottom of the pot.

3) step three, combine the egg yolks and milk
In a separate bowl, place the egg yolks and cornstarch. Whisk them together until smooth and fully combined.
Next, take the boiled milk mixture (the one you previously prepared with milk, sugar, and cream cheese) and, while whisking constantly, slowly pour it into the egg yolk and cornstarch mixture. It’s important to pour slowly and whisk as you go to prevent the eggs from cooking too quickly.
Once you’ve carefully incorporated all the milk into the egg mixture, transfer the entire mixture back into the pot. This step will allow the mixture to thicken, forming the rich custard-like consistency needed for your no-bake Biscoff cheesecake.
hydrate the gelatin sheets in cold water for at least 3 minutes.


4) step four, cook the mixture until it thickens
After transferring the mixture back to the pot, continue cooking it over medium heat. Stir the mixture constantly to avoid any lumps from forming. As the heat works through the mixture, it will begin to thicken into a creamy, custard-like texture. Pour the hydrated gelatin sheets, don’t add the water make sure to remove as much water as you can.
Once the mixture reaches a thick consistency, resembling that of a pudding, remove it from the heat. This is the point where the custard is ready, and you can stop cooking.

5) step five, pour the mixture over the base
Once the custard-like mixture has cooled slightly, pour it carefully over the prepared Biscoff biscuit base in your pan. Gently shake the pan to help level the mixture and remove any air bubbles trapped inside. This step will ensure that your no-bake Biscoff cheesecake has a smooth, even texture.
Now, refrigerate the cheesecake for at least 6 h to allow it to set properly.

6) step six, decorate the no bake Biscoff cheesecake
Once your no-bake Biscoff cheesecake has chilled and set, melt the Biscoff spread until it becomes smooth and pourable. Pour it generously over the top of the chilled cheesecake. For extra texture and flavor, crush some Biscoff biscuits and sprinkle them around the edges of the cheesecake. This adds a delightful crunch and enhances the Biscoff flavor throughout the dessert.


Tell us what you think in the comments!
Print
NO BAKE Biscoff cheesecake
- Prep Time: 20 minutes
- Total Time: 6 hours 20 minutes
- Yield: 8 1x
Description
No oven, really creamy and delicious no bake cheesecake
Ingredients
crust
- 125 grams lotus biscoff cookies
- 45 grams melted butter
filling
- 325 grams of cream cheese
- 3 egg yolks
- 300 grams of milk
- 170 grams of sugar
- 3 1/2 gelatin sheets
- 1 tablespoon of cornstarch
decorate
- 150 grams lotus biscoff spread
- 5 Biscoff biscuits
Instructions
step one, make the crust
- Start by crushing the Biscoff biscuits into fine crumbs. You can do this by either placing the biscuits in a zip-top bag and using a rolling pin to crush them, or by using a food processor for a quicker result. Once the biscuits are crushed, transfer the crumbs to a bowl.
- Next, melt some butter until it’s completely liquid. Pour the melted butter into the crushed Biscoff biscuits and mix well until the crumbs are evenly coated. The butter will help bind the crumbs together and form a sturdy crust.
- Now, transfer the mixture into a prepared pan. Press the mixture down firmly into the bottom of the pan to form an even layer. Use the back of a spoon or a flat object to press the crust into place. Once it’s pressed, place the pan in the fridge for at least 30 minutes to let the crust set and firm up.
step two, prepare the custard base
- In a medium-sized pot, combine the milk, sugar, and cream cheese. Stir the ingredients together until the cream cheese starts to soften and mix with the milk and sugar. Place the pot over medium heat and bring the mixture to a boil, stirring occasionally to ensure the ingredients don’t stick to the bottom of the pot.
step three, combine the egg yolks and milk
- In a separate bowl, place the egg yolks and cornstarch. Whisk them together until smooth and fully combined.
- Next, take the boiled milk mixture (the one you previously prepared with milk, sugar, and cream cheese) and, while whisking constantly, slowly pour it into the egg yolk and cornstarch mixture. It’s important to pour slowly and whisk as you go to prevent the eggs from cooking too quickly.
- Once you’ve carefully incorporated all the milk into the egg mixture, transfer the entire mixture back into the pot. This step will allow the mixture to thicken, forming the rich custard-like consistency needed for your no-bake Biscoff cheesecake.
- hydrate the gelatin sheets in cold water for at least 3 minutes.
step four, cook the mixture until it thickens
- After transferring the mixture back to the pot, continue cooking it over medium heat. Stir the mixture constantly to avoid any lumps from forming. As the heat works through the mixture, it will begin to thicken into a creamy, custard-like texture. Pour the hydrated gelatin sheets, don’t add the water make sure to remove as much water as you can.
- Once the mixture reaches a thick consistency, resembling that of a pudding, remove it from the heat. This is the point where the custard is ready, and you can stop cooking.
step five, pour the mixture over the base
- Once the custard-like mixture has cooled slightly, pour it carefully over the prepared Biscoff biscuit base in your pan. Gently shake the pan to help level the mixture and remove any air bubbles trapped inside. This step will ensure that your no-bake Biscoff cheesecake has a smooth, even texture.
- Now, refrigerate the cheesecake for at least 6 h to allow it to set properly.
step six, decorate the no bake Biscoff cheesecake
- Once your no-bake Biscoff cheesecake has chilled and set, melt the Biscoff spread until it becomes smooth and pourable. Pour it generously over the top of the chilled cheesecake. For extra texture and flavor, crush some Biscoff biscuits and sprinkle them around the edges of the cheesecake. This adds a delightful crunch and enhances the Biscoff flavor throughout the dessert.
Nutrition
- Calories: 500
- Sugar: 37
- Sodium: 244
- Fat: 32
- Saturated Fat: 15
- Carbohydrates: 47
- Fiber: 0.5
- Protein: 8
- Cholesterol: 131
How to serve / how to garnish:
To finish off your no-bake Biscoff cheesecake, pour melted Biscoff spread generously over the top for a smooth, creamy finish. Next, crush a few Biscoff biscuits and sprinkle them on the sides of the cheesecake, adding a crunchy texture. For an extra touch of elegance, leave some whole Biscoff biscuits to decorate the top, creating a beautiful and delicious presentation.
This simple yet stunning garnish adds not only visual appeal but also enhances the already rich Biscoff flavor, making your cheesecake even more irresistible!
Archersfood
Recipes from my family to yours

I don’t have gelatin sheets, just gelatin powder. Do you know how much of that to add?