A fresh and refreshing Japanese delight made with fresh fruits and whipped cream
How to make this super easy and refreshing Fruit Sando – the perfect Japanese sandwich filled with fresh, vibrant fruits like strawberries, banana, and kiwi. This simple recipe combines fluffy bread with a creamy filling, making it a deliciously sweet treat for any time of the day. Ideal for breakfast, snacks, or a light dessert, this Fruit Sando is a refreshing, Instagram-worthy delight!
౨ৎ

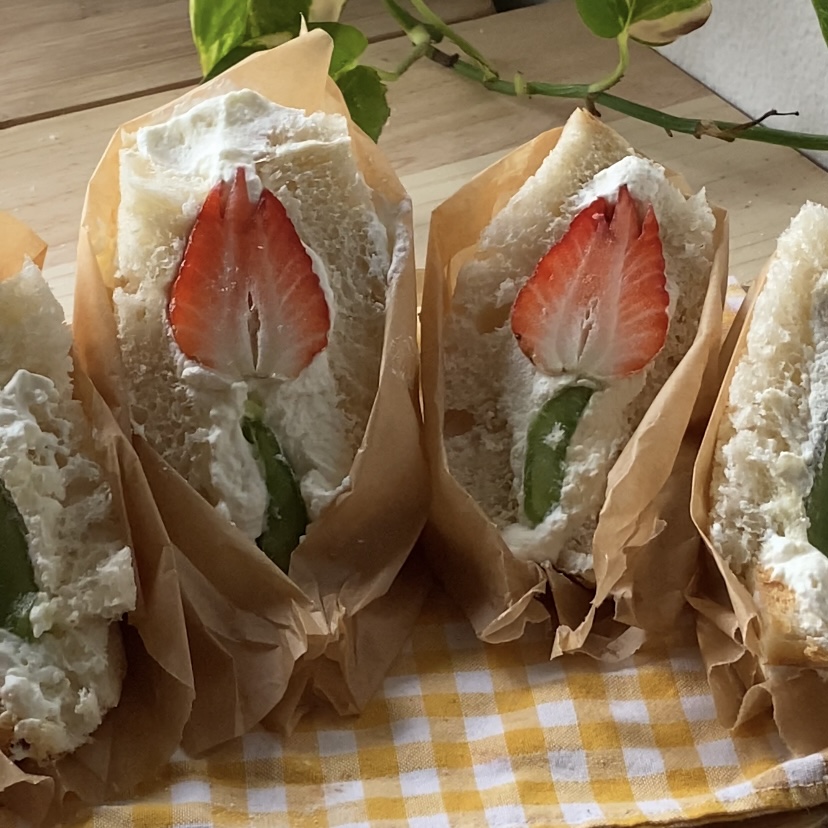
After seeing Fruit Sando all over Pinterest, we decided to create our own version using fresh, vibrant fruits like strawberries, kiwi, and banana. We even managed to create cute, flower-like designs with the fruit, making it as fun to look at as it is to eat. This refreshing fruit sandwich is incredibly easy to make, and it’s perfect for a light snack or breakfast. For the best results, use fresh white bread – we found that day-old bread can get a bit dry.
The beauty of this Japanese Fruit Sando is its versatility – feel free to experiment with different fruit combinations or add a sweet creamy filling for extra flavor. Plus, it only takes a few minutes to prepare and uses simple ingredients that you likely already have in your kitchen

Ingredients for your favorite fruit Sando
To make a delicious fruit sandwich, you’ll need simple ingredients that are easy to find in your kitchen. Here’s what we used:
Fresh white bread: For the soft, fluffy sandwich base. We recommend using fresh bread to avoid dryness.
Fresh fruits: Strawberries, kiwi, and banana (but feel free to use any of your favorite fruits like mango, peach, or melon).
Heavy whipping cream: The base for the creamy filling. You can also use cream cheese or mascarpone cheese for a more decadent flavor.
Tips for making the best fruit Sando
—Use Fresh Bread: Fresh white bread is key to making your Fruit Sando soft and delicious. Day-old bread can become dry and might not provide the right texture.
—Customize with Different Fruits: While we used strawberries, kiwi, and banana, the beauty of Fruit Sando is that you can use whatever fresh fruits you prefer. Try adding mango, peach, or grapes for a unique twist!
—Add a Sweetener: If you want a sweeter filling, you can add a bit of powdered sugar or vanilla extract to the whipped cream for extra flavor.
—Refrigerate before you cut.
Equipment you’ll need to make this delicious fruit Sando
- Mixing bowl, is crucial for preparing the whipped cream filling and assembling your Fruit Sando. It’s where you’ll combine your ingredients—whether it’s whipping cream, cream cheese, or mascarpone
- whisk, You’ll need it to whip the heavy cream into soft peaks.
- Or electric hand mixer, it can save you time and effort when whipping cream.
- knife, essential for cutting your fruits (like strawberries, kiwi, and banana)
- food plastic wrap is used to cover the Fruit Sando after you’ve assembled it.
- Parchment paper is useful for assembling your Fruit Sando.
- Frosting spatula or spoon is perfect for spreading the whipped cream or any filling evenly across the bread.
- ma. rker. You can lightly mark where to cut, ensuring even, attractive portions of your Fruit Sando. It’s especially useful for those aiming for perfectly symmetrical sandwiches that are visually appealing.
Can I use store store-bought pre whipped cream for my fruit sando?
For this Fruit Sando recipe, we recommend using heavy whipping cream and whipping it yourself, (use 35 % heavy whipping cream) rather than using store-bought pre-whipped cream. Homemade whipped cream has a fresher taste and a lighter, fluffier texture, which is perfect for creating a creamy filling that complements the fresh fruit and soft bread

What is 35% heavy cream?
Heavy cream also known as heavy whipping cream means that it contains 35% milk fat. With 35% fat content, it’s thick and creamy which makes it perfect for whipping into stiff peaks. Because of its high fat content, it can be whipped easily to create a light, airy texture—ideal for topping desserts like fruit sandwiches (fruit sando).
How to build the kiwi and banana sando?
to create the flower design from the banana, start by peeling the banana, using a sharp knife carefully cut a slit lengthwise along one side of the banana, stopping at about 1 inch before it ends to keep the banana connected, without cutting through the base, create several thin vertical slices inside the banana. Using your fingers carefully fan out the slices to create the decorative effect.
The kiwi is gonna serve as the steam of your fruit flower, peel it and slice it
Spread a generous layer of whipped cream on your bread. The creamy filling will act as the perfect adhesive, holding the fruits together while also adding a rich texture to the sandwich. Place a slice of kiwi on top of the cream and the banana next to it. Cover with heavy cream and spread it using a spatula. Add another slice of bread on top. Wrap the assembled sandwich tightly in plastic wrap. This will help set the sandwich and hold all the layers together. Mark the direction of the fruits with a visible marker. This will guide you when it’s time to cut the sandwich, ensuring that the fruit layers (the banana flower and kiwi stem) are aligned in the right direction.


How to build the strawberry kiwi Sando?
To create a beautiful tulip-shaped strawberry, follow these steps for an eye-catching and unique presentation:
Start by carefully cutting off the green leafy cap of the strawberry. To mimic the delicate petals of a tulip, make two small “V” cuts on opposite sides of the strawberry. The cuts will create the appearance of a tulip’s petal edges, transforming the strawberry into a floral design.
To build the strawberry fruit sando begin with a slice of soft white bread, using a spoon or a small spatula, spread a generous dollop of heavy cream onto the slice of bread. place the strawberry on top of the cream and a slice of kiwi, place another layer of heavy cream on top of the fruit and spread it with a spatula. Close the sandwich with another slice of bread, gently pressing down to help it stick together. Wrap the assembled sandwich tightly in plastic wrap. This will help set the sandwich and hold all the layers together.
Mark the direction of the fruits with a visible marker. This will guide you when it’s time to cut the sandwich, ensuring that the fruit layers (the strawberry tulip and kiwi stem) are aligned in the right direction.


Refrigerate your fruit sando
For the ultimate fruit sando experience, don’t skip the chilling step! After assembling your delicious sandwich with fresh fruit, heavy cream, and soft bread, wrap it tightly in plastic wrap and let it chill in the fridge for at least 30 minutes—the longer, the better!
Why do I have to refrigerate a fruit Sando?
- Firm up the layers: Chilling helps the heavy cream set, allowing the sandwich to hold together better when sliced.
- Enhance flavors: The cool temperature lets the cream and fruit flavors meld, making each bite even more refreshing and flavorful.
- Perfect presentation: A chilled sando is easier to slice into neat, gorgeous pieces with clean edges, revealing the stunning fruit layers inside!
For best results, refrigerate your sando for 1 hour or more.

FAQs About Fruit Sando: Tips, Storage, and Variations
What type of bread should i use to make a fruit sando?
The best bread for a fruit sando is soft, fluffy milk bread, Japanese bread, brioche or soft sandwich bread. These breads are light, airy, and slightly sweet, providing the perfect texture and flavor to complement the fresh fruit and cream filling.
How do i prevent the whipped cream from leaking out?
To prevent the whipped cream from leaking out of your fruit sando, it’s important to use whipped heavy cream that has been properly chilled and thickened. You can also consider adding a small amount of cream cheese or mascarpone cheese to your whipped cream for added stability and flavor. Wrap the sandwich tightly in plastic wrap and refrigerate it for at least 30 minutes to set the cream.
Can I make this sandwich in advance?
Yes! you can absolutely make a fruit sando in advance! it’s ideal to prepare it ahead of time. After assembling your sandwich, wrap it tightly in plastic wrap and refrigerate for at least 30 minutes, or up to several hours. The chilling time allows the cream to firm up and helps the sandwich hold its shape. This makes it perfect for meal prep or picnics.
What fruits work best on a fruit sando?
For the most popular and classic fruit sando, strawberries, oranges, banana or kiwi are the go-to fruits, as their sweetness and vibrant colors look stunning when sliced. However, you can get creative with other fruits like mangoes, blueberries, raspberries, pineapple, grapes, and peaches. Choose fruits that are ripe but firm to prevent sogginess.
౨ৎ
Fruit Sando Recipe
Recipe in cups and grams. You can find the cup measurements in the printable recipe scrolling down at the end.
ingredients
- 125 grams heavy whipping cream (35 %)
- 3 tablespoons sugar
- 1 strawberry
- 1 banana
- 1 kiwi
- 4 slices of soft bread
step by step
1) step one, make whipped cream
Start by placing your mixing bowl in the fridge for a few minutes to chill it, as a cold bowl helps the cream whip more efficiently. Pour the heavy whipping cream into the chilled bowl. Using an electric hand mixer, whip the cream on medium speed. If you’re doing it by hand, whisk as fast as possible to incorporate air into the cream.
Once the cream begins to thicken, add the sugar to sweeten it. Continue whipping until the cream becomes thick, fluffy, and has nearly doubled in size. The whipped cream should hold stiff peaks.

2) step two, cut the bread
Start by slicing your soft, fluffy bread into even thick pieces. You’ll need about four slices—two slices for each sandwich. Make sure the slices are thick enough to hold the whipped cream and fruit without becoming soggy.

3) step three, cut the fruit
To create a fruit flower design in your fruit sando, start by peeling the banana and cutting a slit lengthwise, stopping about 1 inch from the end. Cut several thin vertical slices, then carefully fan them out to form a flower shape. For the kiwi, peel and slice it to serve as the stem. For the strawberry, cut off the green cap, then make two “V” cuts on opposite sides to create a tulip-like shape.


4) step four, build the strawberry sando
Spread a thick layer of whipped cream on a slice of bread, then place the strawberry on its long side to create a flower shape when cut. Next, add the kiwi, but only the outer green skin, leaving the seeds intact. Arrange the fruit so it aligns with the direction you want to cut. This setup ensures a beautiful floral design when sliced. Next, add another layer of whipped cream on top of the fruit, then place a second slice of bread on top.


5) step five, wrap the sando
Wrap the sandwich tightly in plastic wrap to help set the layers. Using a marker, draw a line indicating the direction to cut, ensuring the fruit flower is aligned perfectly when sliced.

6) step six, prepare the kiwi and banana sando
To build the kiwi and banana Sando, start by spreading a layer of whipped cream on a slice of bread. Add the banana, placing it lengthwise on the cream, then add a slice of kiwi next to it. Cover with more whipped cream and spread evenly. Top with another slice of bread, gently pressing to seal. Wrap the sandwich tightly in plastic wrap to set. Mark the direction of the fruit with a visible marker to ensure the banana flower and kiwi stem are aligned when you cut the sandwich.


7) step seven, refrigerate the fruit sando
Leave the sandwich in the fridge for at least 30 minutes, covered tightly in plastic wrap. This will help set the layers and make slicing easier. Once chilled, slice the sandwich whenever you’re ready to serve.


thank you!
If you tried this recipe and liked it, I’d really appreciate it if you could leave a review! Your feedback motivates me to create more content for you all. Thank you so much!
Print
Fruit Sando
- Prep Time: 10 minutes
- Total Time: 35 minutes
- Yield: 2 sando 1x
- Category: Breakfast
- Cuisine: Japanese
Description
easy and refreshing Fruit Sando – the perfect Japanese sandwich filled with fresh, vibrant fruits like strawberries, banana, and kiwi. This simple recipe combines fluffy bread with a creamy filling, making it a deliciously sweet treat for any time of the day. Ideal for breakfast, snacks, or a light dessert, this Fruit Sando is a refreshing.
Ingredients
- 125 grams heavy whipping cream (35 %)
- 3 tablespoons sugar
- 1 strawberry
- 1 banana
- 1 kiwi
- 4 slices of soft bread
Instructions
step one, make whipped cream
- Start by placing your mixing bowl in the fridge for a few minutes to chill it, as a cold bowl helps the cream whip more efficiently. Pour the heavy whipping cream into the chilled bowl. Using an electric hand mixer, whip the cream on medium speed. If you’re doing it by hand, whisk as fast as possible to incorporate air into the cream.
- Once the cream begins to thicken, add the sugar to sweeten it. Continue whipping until the cream becomes thick, fluffy, and has nearly doubled in size. The whipped cream should hold stiff peaks.
step two, cut the bread
- Start by slicing your soft, fluffy bread into even thick pieces. You’ll need about four slices—two slices for each sandwich. Make sure the slices are thick enough to hold the whipped cream and fruit without becoming soggy.
step three, cut the fruit
- To create a fruit flower design in your fruit sando, start by peeling the banana and cutting a slit lengthwise, stopping about 1 inch from the end. Cut several thin vertical slices, then carefully fan them out to form a flower shape. For the kiwi, peel and slice it to serve as the stem. For the strawberry, cut off the green cap, then make two “V” cuts on opposite sides to create a tulip-like shape.
step four, build the strawberry sando
- Spread a thick layer of whipped cream on a slice of bread, then place the strawberry on its long side to create a flower shape when cut. Next, add the kiwi, but only the outer green skin, leaving the seeds intact. Arrange the fruit so it aligns with the direction you want to cut. This setup ensures a beautiful floral design when sliced. Next, add another layer of whipped cream on top of the fruit, then place a second slice of bread on top.
step five, wrap the sando
- Wrap the sandwich tightly in plastic wrap to help set the layers. Using a marker, draw a line indicating the direction to cut, ensuring the fruit flower is aligned perfectly when sliced.
step six, prepare the kiwi and banana sando
- To build the kiwi and banana Sando, start by spreading a layer of whipped cream on a slice of bread. Add the banana, placing it lengthwise on the cream, then add a slice of kiwi next to it. Cover with more whipped cream and spread evenly. Top with another slice of bread, gently pressing to seal. Wrap the sandwich tightly in plastic wrap to set. Mark the direction of the fruit with a visible marker to ensure the banana flower and kiwi stem are aligned when you cut the sandwich.
step seven, refrigerate the fruit sando
- Leave the sandwich in the fridge for at least 30 minutes, covered tightly in plastic wrap. This will help set the layers and make slicing easier. Once chilled, slice the sandwich whenever you’re ready to serve.
Nutrition
- Calories: 516
- Sugar: 35
- Sodium: 285
- Fat: 26
- Saturated Fat: 15
- Carbohydrates: 67
- Fiber: 5
- Protein: 9
- Cholesterol: 71
Archersfood
Recipes from my family to yours


