If you’re looking for a dessert that’s simple to prepare yet impressively indulgent, this no-bake Oreo cheesecake is the perfect choice. With a rich Oreo crust, a creamy cheesecake filling, and a topping of crushed Oreos, this dessert is as delicious as it is easy to make. In this post, we’ll dive into every detail, from assembling the perfect Oreo crust to crafting the smoothest no-bake cheesecake filling. Let’s get started!
Why You’ll Love This No-Bake Oreo Cheesecake
- No Oven Needed: Perfect for hot days or when you don’t want to turn on the oven.
- Quick and Easy: Simple steps make this Oreo cheesecake recipe beginner-friendly.
- Versatile: Great for parties, celebrations, or as an everyday treat.
- Delicious Layers: A crunchy Oreo crust, creamy filling, and irresistible toppings.
Ingredients You’ll Need to make a No bake oreo cheesecake
For this no-bake Oreo cheesecake recipe, you’ll need:
- Oreo Cookies: The base ingredient for the crust, the filling and topping.
- Butter: Helps bind the Oreo crust together.
- Cream Cheese: Creates the creamy cheesecake texture, make sure it’s at room temperature.
- Whipped Cream: Adds lightness to the cheesecake filling.
- Powdered Sugar: Sweetens the filling without graininess.
- White chocolate: it‘s gonna give more flavor to the cheesecake filling and we are also gonna use it to decorate our No bake Oreo cheesecake.
- Milk chocolate: we are gonna melt it and pour it on top of the cheesecake to decorate.

Tips for the Perfect No-Bake Oreo Cheesecake
- To create the best no-bake Oreo cheesecake, let the Oreo crust harden in the freezer while you prepare the filling.
- Softened cream cheese ensures a smooth Oreo cheesecake filling. Leave it in your stand mixer for about 10 minutes before starting.
- Avoid over-whipping your cream to prevent turning it into butter. Freshly whipped cream gives the best results for your no-bake cheesecake with Oreo crust.
- If your cream cheese becomes too liquid (common with certain European brands), use two gelatin sheets. Soak in cold water, then mix with warmed cream cheese for stability.
- No powdered sugar? Blend granulated sugar into a fine powder for your creamy Oreo cheesecake.
- Let your no-bake Oreo cheesecake chill for several hours, preferably overnight, for the perfect texture and flavor.
Variations of No-Bake Oreo Cheesecake
- Chocolate Oreo Cheesecake: Add melted chocolate to the filling for a rich, chocolatey flavor.
- Oreo Cheesecake with Whipped Cream: Use whipped cream as a topping for a light and airy finish.
- Oreo Cheesecake with Milk: Add a splash of milk to the filling for a smoother texture.
- Mini No-Bake Oreo Cheesecakes: Create individual servings in muffin tins or small jars for parties.
- No-Bake Cheesecake with Oreo Crust and Strawberries: Top your cheesecake with fresh strawberries for a fruity twist.

Total of Oreos you’ll need for this cheesecake recipe
Crust: 18 oreos
Cheesecake: 13
Decorate: 6 Oreos
FAQs About No-Bake Oreo Cheesecake
No-bake Oreo cheesecake is easy to prepare because it requires no oven time. The recipe uses simple ingredients like cream cheese, Oreo cookies, white chocolate and whipped cream, making it perfect for beginners or anyone short on time.
Yes, you can make a no-bake Oreo cheesecake without gelatin. However, if you’re using cream cheese that tends to get liquidy, such as certain European brands, you may need gelatin for extra stability.
It takes at least 4–6 hours for a no-bake Oreo cheesecake to set properly in the refrigerator. For the best results, let it chill overnight to ensure the perfect texture.
Yes, if you don’t have powdered sugar, you can use granulated sugar blended in a food processor or blender until it becomes fine and smooth. This works perfectly for the cheesecake filling.
The best way to prepare an Oreo crust is to crush Oreo cookies into fine crumbs and mix them with melted butter. Press the mixture firmly into a pan and freeze it while you make the filling to ensure a solid base.
To achieve a creamy filling, ensure your cream cheese is fully softened, whip the cream to soft peaks, and fold the ingredients gently to maintain a light texture. Avoid overmixing to keep the filling smooth.
Softened cream cheese blends more easily with other ingredients, preventing lumps in your cheesecake filling. Let it sit at room temperature or soften it in your stand mixer for about 10 minutes before using it.

Why This Oreo Cheesecake Recipe Stands Out
This no-bake Oreo cheesecake combines ease, flavor, and versatility. It’s creamy, indulgent, and perfect for any occasion. Whether you’re hosting a party or satisfying a late-night craving, this dessert never fails to impress.
How to Make No-Bake Oreo Cheesecake
- The foundation of this dessert is the Oreo crust. To make it, separate the cream from the cookie crush Oreo cookies into fine crumbs. Combine the crumbs with melted butter and press the mixture firmly into the base of your springform pan. This will form a sturdy base for your cheesecake. Place the crust in the refrigerator to set.
- In a mixing bowl, combine softened cream cheese, oreo filling, melted white chocolate and powdered sugar. Beat until smooth and creamy. Fold in whipped cream to lighten the texture. This step ensures a fluffy and creamy Oreo cheesecake filling. Add crushed oreos to mix with the filling.
- Pour half of the cheesecake filling over the prepared Oreo crust, add crushed oreos in the middle layer add the rest of the filling and spread it evenly. Tap the pan gently on the counter to remove air bubbles.
- Refrigerate the assembled cheesecake for at least 4-6 hours or overnight. This allows the filling to firm up, making it easier to slice.
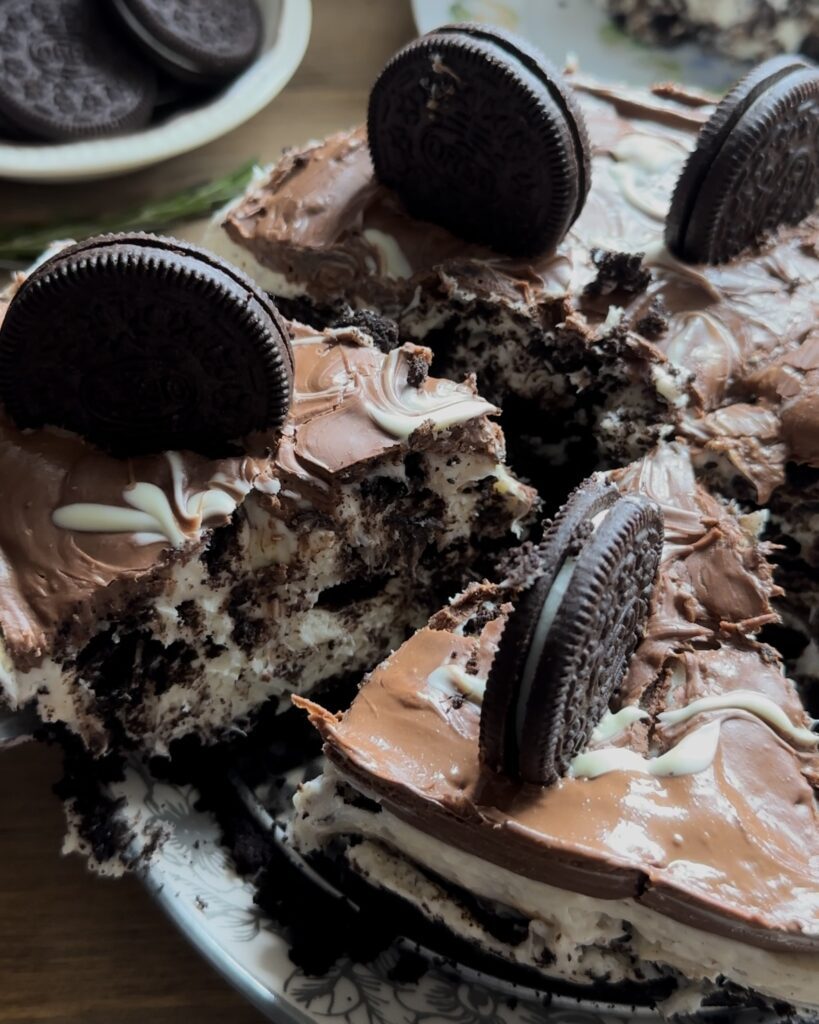
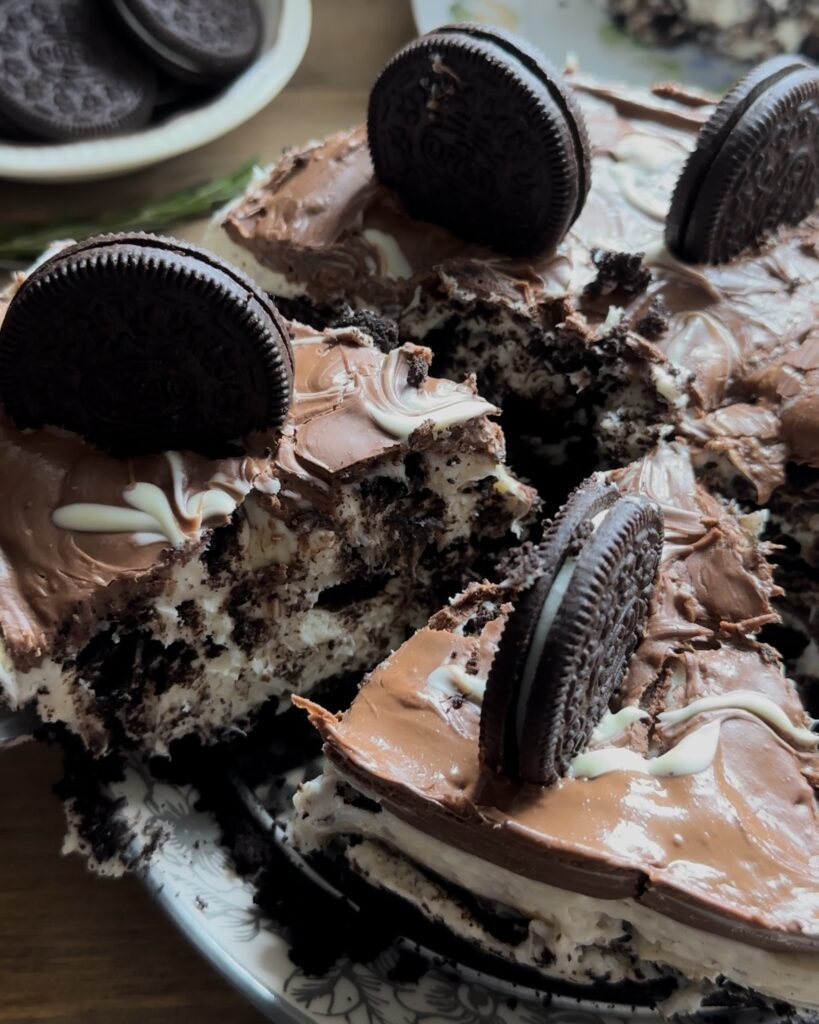
- Before serving, decorate your no-bake Oreo cheesecake with melted white chocolate and milk chocolate plus oreo biscuits on top.
Process pictures:


More cheesecake recipes:
-Lotus Biscoff no bake cheesecake
-Cheesecake with homemade raspberry jam
Storing and Serving Suggestions
- Storing: Keep the cheesecake covered in the refrigerator for up to 5 days.
- Freezing: Wrap individual slices in plastic wrap and freeze for up to 2 months.
- Serving: Serve chilled, garnished with milk chocolate, white chocolate and whole oreos. You can add mini oreos and whipped cream if you want too.
Recipe to make a no bake oreo cheesecake
Recipe in cups and grams. You can find the cup measurements in the printable recipe scrolling down at the end
ingredients
oreo crust
- 18 oreos (only the biscuit)
- 40 grams butter
cheesecake
- 500 grams cream cheese
- 120 grams powdered sugar
- 100 grams white chocolate
- 18 oreos (only the cream from inside)
- 200 grams whipping cream
- 10 chopped oreos
- 3 Chopped oreos
to decorate
- 120 grams milk chocolate
- 50 grams white chocolate
- 6 oreos
step by step how to make No Bake oreo cheesecake
1) step one, separate de biscuit to the cream
To prepare this no-bake Oreo cheesecake, start by carefully separating the Oreo cookies. Gently twist each cookie to split it apart, placing the cookie halves into one bowl and the creamy filling into another. The cookie halves will be used for the crust, while the cream filling will add richness and flavor to the cheesecake layer later in the process. This simple step ensures that every part of the Oreo is perfectly utilized in your cheesecake recipe.


2) step two, Prepare the oreo crust
For the second step of this no-bake Oreo cheesecake, you’ll need to crush the Oreo cookies into fine crumbs for the crust. There are two easy methods to do this:
- Using a food processor: Transfer the Oreo cookies into the food processor and pulse until they’re finely crushed into a uniform texture. This method is quick and ensures the crumbs are perfectly even.
- Using a ziplock bag and rolling pin: Place the Oreo cookies into a ziplock bag, ensuring all the air is squeezed out before sealing it. Use a rolling pin to gently crush the cookies, applying steady pressure until they form fine crumbs.
Once the crumbs are ready, melt the butter in the microwave and mix it thoroughly with the Oreo crumbs until the mixture resembles wet sand. This buttery Oreo crumb mixture will serve as the base for your cheesecake.


3) step three, refrigerate the crust
Next, prepare the pan for the Oreo crust. Grease your pan lightly to ensure the crust releases easily later. Pour the Oreo crumbs mixed with melted butter into the pan. Use the back of a spoon or the flat bottom of a glass to press the mixture firmly and evenly across the bottom of the pan, ensuring a compact base. You can press some of the mixture slightly up the sides if desired to create a slight edge for the cheesecake filling.
Once the crust is firmly in place, place the pan in the freezer to chill and harden while you prepare the cheesecake filling. Freezing helps the crust set and stay firm, ensuring the perfect base for your no-bake Oreo cheesecake.

4) step four, prepare the filling
To prepare the filling for your cheesecake, soften the cream cheese. If using a spatula, ensure it’s at room temperature and mix for 5 to 10 minutes until smooth. With a stand mixer, use the paddle attachment on low speed for the same time. Once softened, mix in the powdered sugar until fully incorporated and creamy.


5) step five, add the melted chocolate
Melt the white chocolate in the microwave, ensuring it doesn’t overheat or burn. Use a microwave-safe bowl and heat the chocolate in 10-second intervals, stirring well after each session until smooth and fully melted. Stirring frequently helps achieve a silky texture without lumps.
Once the chocolate is ready, add it to the softened cream cheese mixture. At this stage, also mix in the reserved Oreo filling from earlier. Blend everything thoroughly to create a smooth, luscious cheesecake filling with a perfect balance of flavors. This step ensures your easy Oreo cheesecake recipe is rich, creamy, and irresistibly delicious.

6) step six, chop oreo biscuits
Roughly chop the Oreo cookies into small pieces and fold them into the cream cheese mixture for added texture and flavor. In a separate clean, dry bowl, whip the heavy cream using an electric mixer or a whisk on medium speed until soft peaks form. Be careful not to over-whip the cream, as this can cause it to turn into butter.
Once the whipped cream is ready, gently fold it into the cream cheese mixture using a spatula. This step adds lightness to the filling, creating a smooth and airy texture for your no-bake Oreo dessert.


7) step seven, add the filling to the crust
Pour half of the creamy filling into the prepared Oreo crust, spreading it evenly across the base. Chop three Oreo cookies and sprinkle them over the cheesecake filling for an extra burst of flavor. Then, pour the remaining cheesecake mixture on top, spreading it evenly to cover the Oreo layer. Smooth the top using a spatula or spoon for a clean finish.
Place the cheesecake in the fridge for about 8 hours to allow it to set and achieve the perfect texture. This step is crucial for a firm and well-set no-bake Oreo cheesecake that will hold its shape when sliced.


8) step eight, decorate the cheesecake
Melt the milk chocolate in one bowl and the white chocolate in another. Once both chocolates are fully melted, pour the milk chocolate over the cheesecake, covering the entire surface. Then, take the melted white chocolate and, using a spoon, drizzle it over certain sections of the cheesecake.
To create a decorative pattern, use a toothpick to gently swirl the two chocolates together, forming a beautiful marbled effect. Once the cheesecake is decorated, cut into slices and enjoy your decadent no-bake Oreo cheesecake with chocolate drizzle.



No bake Oreo cheesecake
- Prep Time: 45 minutes
- Total Time: 4 hours 45 minutes
- Yield: 6 1x
Description
The Ultimate No-Bake Oreo Cheesecake Recipe: A Creamy Delight for Every Occasion
Ingredients
oreo crust
- 18 oreos (only the biscuit)
- 40 grams butter
cheesecake
- 500 grams cream cheese
- 120 grams powdered sugar
- 100 grams white chocolate
- 18 oreos (only the cream from inside)
- 200 grams whipping cream
- 10 chopped oreos
- 3 Chopped oreos
to decorate
- 120 grams milk chocolate
- 50 grams white chocolate
- 6 oreos
Instructions
step one, separate de biscuit to the cream
- To prepare this no-bake Oreo cheesecake, start by carefully separating the Oreo cookies. Gently twist each cookie to split it apart, placing the cookie halves into one bowl and the creamy filling into another. The cookie halves will be used for the crust, while the cream filling will add richness and flavor to the cheesecake layer later in the process. This simple step ensures that every part of the Oreo is perfectly utilized in your cheesecake recipe.
step two, Prepare the oreo crust
- For the second step of this no-bake Oreo cheesecake, you’ll need to crush the Oreo cookies into fine crumbs for the crust. There are two easy methods to do this:
- Using a food processor: Transfer the Oreo cookies into the food processor and pulse until they’re finely crushed into a uniform texture. This method is quick and ensures the crumbs are perfectly even.
- Using a ziplock bag and rolling pin: Place the Oreo cookies into a ziplock bag, ensuring all the air is squeezed out before sealing it. Use a rolling pin to gently crush the cookies, applying steady pressure until they form fine crumbs.
- Once the crumbs are ready, melt the butter in the microwave and mix it thoroughly with the Oreo crumbs until the mixture resembles wet sand. This buttery Oreo crumb mixture will serve as the base for your cheesecake.
step three, refrigerate the crust
- Next, prepare the pan for the Oreo crust. Grease your pan lightly to ensure the crust releases easily later. Pour the Oreo crumbs mixed with melted butter into the pan. Use the back of a spoon or the flat bottom of a glass to press the mixture firmly and evenly across the bottom of the pan, ensuring a compact base. You can press some of the mixture slightly up the sides if desired to create a slight edge for the cheesecake filling.
- Once the crust is firmly in place, place the pan in the freezer to chill and harden while you prepare the cheesecake filling. Freezing helps the crust set and stay firm, ensuring the perfect base for your no-bake Oreo cheesecake.
step four, prepare the filling
- To prepare the filling for your cheesecake, soften the cream cheese. If using a spatula, ensure it’s at room temperature and mix for 5 to 10 minutes until smooth. With a stand mixer, use the paddle attachment on low speed for the same time. Once softened, mix in the powdered sugar until fully incorporated and creamy.
step five, add the melted chocolate
- Melt the white chocolate in the microwave, ensuring it doesn’t overheat or burn. Use a microwave-safe bowl and heat the chocolate in 10-second intervals, stirring well after each session until smooth and fully melted. Stirring frequently helps achieve a silky texture without lumps.
- Once the chocolate is ready, add it to the softened cream cheese mixture. At this stage, also mix in the reserved Oreo filling from earlier. Blend everything thoroughly to create a smooth, luscious cheesecake filling with a perfect balance of flavors. This step ensures your easy Oreo cheesecake recipe is rich, creamy, and irresistibly delicious.
step six, chop oreo biscuits
- Roughly chop the Oreo cookies into small pieces and fold them into the cream cheese mixture for added texture and flavor. In a separate clean, dry bowl, whip the heavy cream using an electric mixer or a whisk on medium speed until soft peaks form. Be careful not to over-whip the cream, as this can cause it to turn into butter.
- Once the whipped cream is ready, gently fold it into the cream cheese mixture using a spatula. This step adds lightness to the filling, creating a smooth and airy texture for your no-bake Oreo dessert.
step seven, add the filling to the crust
- Pour half of the creamy filling into the prepared Oreo crust, spreading it evenly across the base. Chop three Oreo cookies and sprinkle them over the cheesecake filling for an extra burst of flavor. Then, pour the remaining cheesecake mixture on top, spreading it evenly to cover the Oreo layer. Smooth the top using a spatula or spoon for a clean finish.
- Place the cheesecake in the fridge for about 8 hours to allow it to set and achieve the perfect texture. This step is crucial for a firm and well-set no-bake Oreo cheesecake that will hold its shape when sliced.
step eight, decorate the cheesecake
- Melt the milk chocolate in one bowl and the white chocolate in another. Once both chocolates are fully melted, pour the milk chocolate over the cheesecake, covering the entire surface. Then, take the melted white chocolate and, using a spoon, drizzle it over certain sections of the cheesecake.
- To create a decorative pattern, use a toothpick to gently swirl the two chocolates together, forming a beautiful marbled effect. Once the cheesecake is decorated, cut into slices and enjoy your decadent no-bake Oreo cheesecake with chocolate drizzle.
Notes
To create the best no-bake Oreo cheesecake, let the Oreo crust harden in the freezer while you prepare the filling.
Softened cream cheese ensures a smooth Oreo cheesecake filling. Leave it in your stand mixer for about 10 minutes before starting.
Avoid over-whipping your cream to prevent turning it into butter. Freshly whipped cream gives the best results for your no-bake cheesecake with Oreo crust.
If your cream cheese becomes too liquid (common with certain European brands), use two gelatin sheets. Soak in cold water, then mix with warmed cream cheese for stability.
No powdered sugar? Blend granulated sugar into a fine powder for your creamy Oreo cheesecake.
Let your no-bake Oreo cheesecake chill for several hours, preferably overnight, for the perfect texture and flavor.
Nutrition
- Calories: 1220
- Sugar: 93
- Sodium: 762
- Fat: 76
- Saturated Fat: 39
- Carbohydrates: 130
- Fiber: 4
- Protein: 14
- Cholesterol: 123
Archersfood
Recipes from my family to yours
