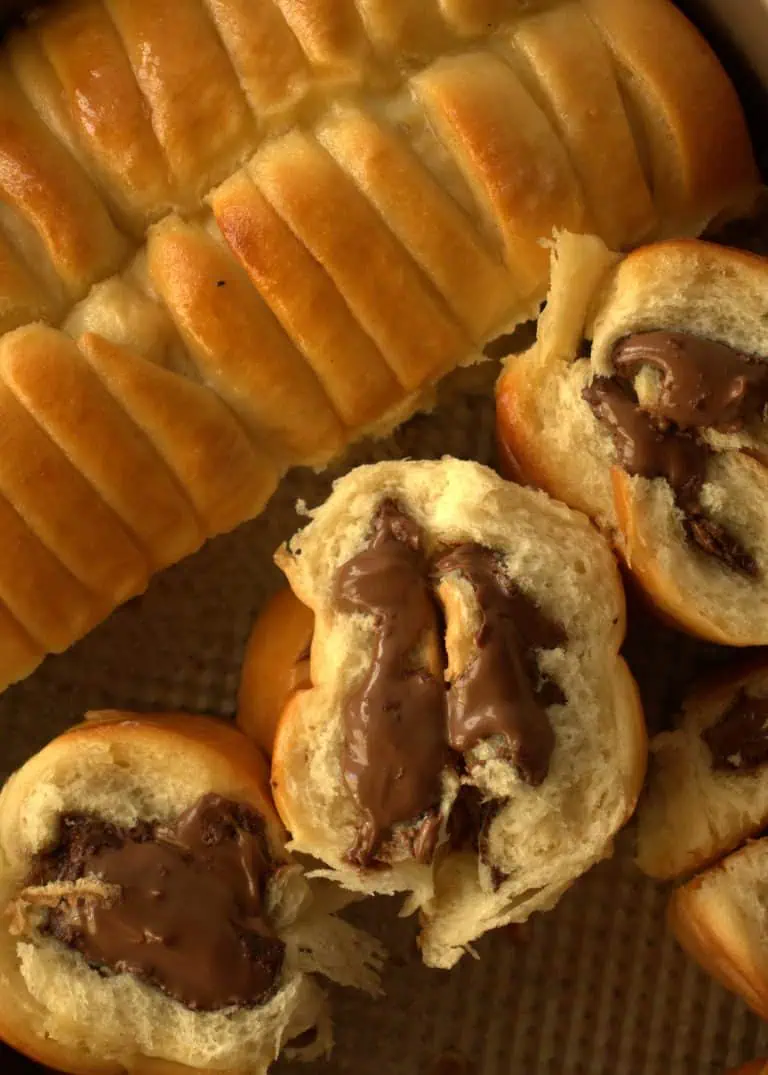
Texas Roadhouse Rolls
This is the best recipe for Texas Roadhouse rolls. If you’ve ever dined at Texas Roadhouse, you know that their soft, buttery rolls paired with their iconic cinnamon butter are nothing short of legendary. The good news? You can now recreate this mouthwatering experience at home with our Texas Roadhouse rolls recipe! Perfectly fluffy, slightly sweet, and absolutely delicious, these rolls are a must-have for dinner, holidays, or just because.

This homemade Texas Roadhouse rolls recipe will guide you step by step to achieve the same melt-in-your-mouth texture and golden-brown perfection you crave. And let’s not forget the Texas Roadhouse cinnamon butter – the ultimate spread that elevates these rolls to a whole new level of indulgence. Whether you’re hosting a family meal or craving restaurant-style comfort food, these fluffy dinner rolls will steal the show.
If you try this recipe please leave us feedback! Thank you!
Not only are these buttery soft rolls easy to make, but they’re also a fun baking project to enjoy with loved ones. Trust us, the aroma of fresh bread baking in your kitchen is worth every minute. So, get ready to impress your family and friends with this Texas Roadhouse rolls copycat recipe, complete with the creamiest and sweetest homemade cinnamon butter spread.
How do you make yeast mixture to make Texas Roadhouse rolls?
The secret to achieving perfectly soft and fluffy dinner rolls lies in the yeast mixture. This essential step helps the rolls rise beautifully, giving them their iconic texture and lightness. Here’s everything you need to know about preparing the yeast mixture for this Texas Roadhouse rolls recipe.
Begin by warming the milk until it’s warm but not hot to the touch, then pour it into a mixing bowl. Add the milk and active dry yeast, stirring gently to dissolve. Let the mixture sit for 5-10 minutes, allowing it to become frothy and bubbly. This step ensures the yeast is activated and ready to help the dough rise, giving your homemade Texas Roadhouse rolls their signature fluffy texture. If no bubbles form, start over with fresh yeast and properly warmed milk.
This yeast mixture is the foundation of the dough, ensuring your homemade Texas Roadhouse rolls are light, fluffy, and irresistible. Be sure to use fresh yeast, check the expiry date and follow these steps carefully for the best results.

What equipment do I need to make Texas Roadhouse rolls from scratch?
- Mixing Bowls: Essential for combining ingredients for Texas Roadhouse rolls and cinnamon butter.
- Stand Mixer: Helps knead dough for fluffy dinner rolls and blend cinnamon butter.
- Measuring Cups and Spoons or kitchen scale: Crucial for accurate measurements in your Texas Roadhouse rolls recipe.
- Rolling Pin: Helps shape dough for soft dinner rolls with perfect consistency.
- Baking Sheet or Pan: Used for baking fluffy dinner rolls or Texas Roadhouse-inspired rolls.
- Parchment Paper: Prevents sticking and makes cleanup easier for restaurant-style rolls.
- Pastry Brush: Perfect for brushing sweet cinnamon butter onto rolls for a golden finish.
- Cooling Rack: Allows homemade Texas Roadhouse rolls to cool evenly and stay soft.
- Whisk: For mixing cinnamon butter spread to top your Texas Roadhouse rolls.
- Oven: Provides even heat to bake Texas Roadhouse rolls and buttery soft rolls.
How to Shape Texas Roadhouse Rolls for Their Signature Look
To create the iconic Texas Roadhouse rolls, start by rolling out the dough into a thin, even sheet on a floured surface. Fold the dough in half to create a layered effect, which will give the rolls their characteristic soft and fluffy interior. Next, cut the folded dough in half lengthwise, and then slice each section crosswise to create even squares.
– Cut in Half and Make Squares: First, cut the folded dough in half lengthwise. Then, slice each section crosswise to create uniform squares. This step is key to achieving the classic shape of Texas Roadhouse rolls.
– Roll Out the Dough: Roll the dough into a rectangular sheet, ensuring it’s evenly thin for consistent baking.
– Fold the Dough: Carefully fold the sheet of dough in half, aligning the edges to create a double layer.


How to Make Texas Roadhouse Cinnamon Butter
No Texas Roadhouse rolls recipe is complete without the rich, creamy, and slightly sweet cinnamon butter. This easy-to-make spread perfectly complements the soft, fluffy rolls and adds a touch of indulgence to every bite. Here’s how you can make your own Texas Roadhouse cinnamon butter at home using just three simple ingredients: honey, butter, and powdered sugar.
- Whip the Butter: In a mixing bowl, use a hand mixer or whisk to whip the softened butter until it’s light and creamy.
- Add the Sweetness: Gradually mix in the powdered sugar, ensuring it’s fully incorporated for a smooth texture.
- Blend in Honey and Cinnamon: Add the honey and ground cinnamon, stirring until the mixture is well combined and fluffy.
- Serve and Enjoy: Transfer the cinnamon butter to a small serving bowl or container and serve it alongside your freshly baked Texas Roadhouse rolls.
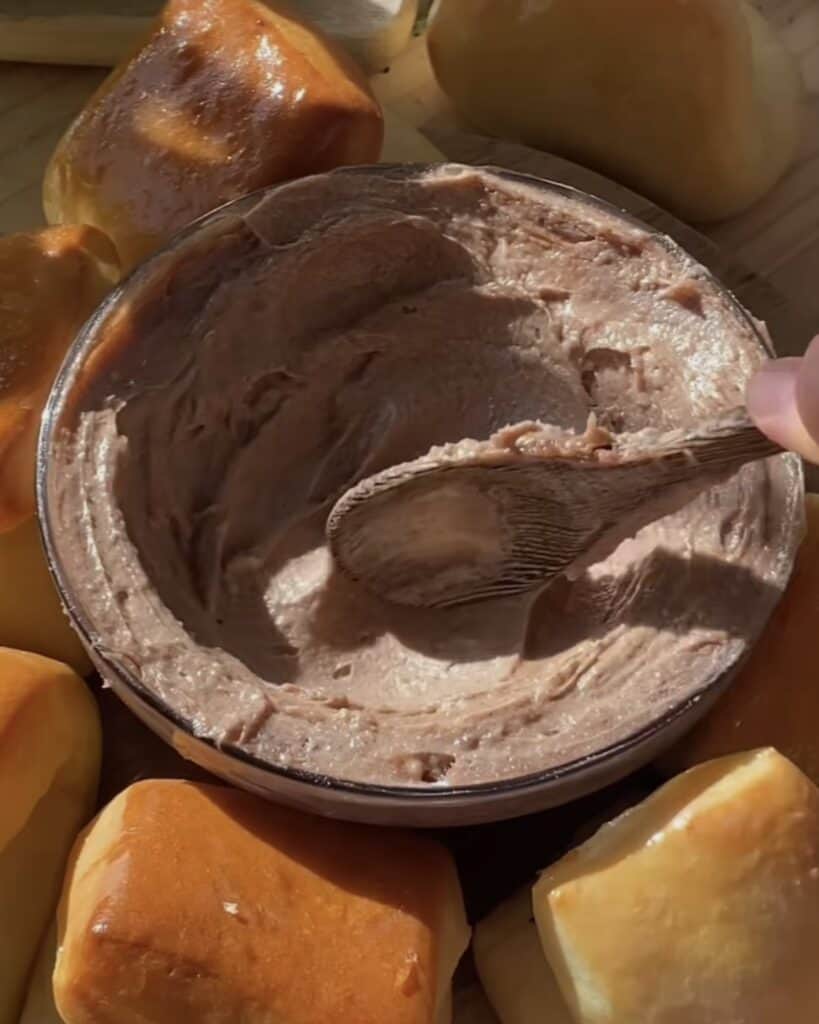
This Texas Roadhouse cinnamon butter recipe is incredibly versatile and can also be used as a spread for toast, bagels, or pancakes. The combination of honey and powdered sugar gives it the perfect sweetness, while the cinnamon adds a warm, cozy flavor. Whip up a batch today and take your homemade Texas Roadhouse rolls to the next level of deliciousness!
Best tips on how to make Texas Roadhouse Rolls
- Ensure Yeast is Fresh: Make sure your active dry yeast is not expired. Fresh yeast is crucial for proper rise and texture in your soft dinner rolls. Always activate it in warm milk to check if it foams up, signaling it’s ready to go.
- Press the Dough Slightly: When folding the dough and cutting it into squares, use a rolling pin to gently press down on the dough. This ensures the squares stick together without separating during baking, giving you uniform dinner rolls.
- Minimal Proofing: Keep in mind that this is a dough that doesn’t proof a lot. Just let it rise until slightly puffed, and proceed with the baking process.
- Use Room Temperature Butter for Cinnamon Butter: For your Texas Roadhouse cinnamon butter, make sure the unsalted butter is softened to room temperature before mixing, don’t melt it in the microwave. This helps achieve a smooth, spreadable texture that complements the warm rolls perfectly.
- Bake Until Golden: Bake your rolls at 190°C/375°F until they are golden brown on top. This ensures a perfect contrast between the crispy outer layer and the soft, fluffy interior.
- Brush them with egg before baking for a nice golden color and brush them with melted butter after, for a shinny bun.
By following these tips, you’ll ensure your Texas Roadhouse-inspired rolls turn out soft, fluffy, and delicious every time, paired perfectly with homemade cinnamon butter.

How to make Texas Roadhouse rolls without active dry yeast?
To make Texas Roadhouse rolls without active dry yeast, you can substitute fresh yeast or instant yeast. Here’s how to adjust the recipe:
Substituting with Fresh Yeast:
- Fresh yeast (also known as cake yeast) is typically used in a 2:1 ratio when compared to active dry yeast. For every 2 teaspoons of active dry yeast, use 4 teaspoons of fresh yeast.
- How to make it work: Crumble the fresh yeast into warm water (around 100°F/37°C) incorporate into the dough in the middle of kneading.
Substituting with Instant Yeast:
- Instant yeast can be used as a direct substitution for active dry yeast without needing to activate it first. Use the same amount of instant yeast as the recipe calls for active dry yeast. For 2 teaspoons of active dry yeast, use 2 teaspoons of instant yeast.
- How to make it work: Simply mix the instant yeast directly with the dry ingredients since it doesn’t need to be activated beforehand, and continue with the recipe.
By using these substitutes, you can easily make your Texas Roadhouse-inspired rolls with either fresh yeast or instant yeast, ensuring they rise beautifully and turn out soft and fluffy.
Common Questions About Texas Roadhouse Rolls
What makes Texas Roadhouse rolls so soft and fluffy?
The secret lies in the perfect yeast mixture, a slightly sweet dough, and allowing the rolls to rise twice. These steps create the signature buttery soft rolls texture everyone loves.
How do I get the golden-brown color on top of the rolls?
Brush the tops of the rolls with egg before baking and use melted butter after baking. This gives the buttery soft rolls their irresistible golden hue and rich flavor.
What’s the best way to store Texas Roadhouse rolls?
Store them in an airtight container at room temperature for up to 2 days. Reheat them briefly in the oven or microwave to restore their warm and fluffy texture.
Can I make the cinnamon butter ahead of time?
Absolutely! The Texas Roadhouse cinnamon butter can be prepared in advance and stored in the fridge for up to a week. Let it come to room temperature before serving for the creamiest spread.
Youtube vide of the full recipe step by step on how to make Texas Roadhouse rolls and cinnamon butter:
Recipe for Texas Roadhouse rolls and cinnamon butter
Recipe in cups and grams. You can find the cup measurements in the printable recipe scrolling down at the end.
ingredients
texas roadhouse rolls
- 90 ml warm milk
- 1 1/2 tablespoons honey
- 2 teaspoons active dry yeast
- 150 g bread flour
- 100 g all purpose flour
- 20 g room temperature butter
- 1 egg
- 1/2 teaspoon salt
egg wash for the rolls
- 1 egg
- 1 tablespoon heavy cream
cinnamon butter
- 100 g soft butter
- 50 g powdered sugar
- 1 teaspoon cinnamon
- 1 tablespoon honey
step by step on how to make Texas Roadhouse rolls
1) step one, yeast mixture
To start, warm milk in a small bowl until it reaches about 110°F (warm to the touch but not hot). Add active dry yeast and stir in honey. The warmth helps activate the yeast, while the honey helps and adds a subtle sweetness that enhances the flavor of the Texas Roadhouse rolls. Let the mixture sit for 5-10 minutes until it becomes frothy and bubbly, signaling that the yeast is active and ready to rise, setting the foundation for soft, fluffy dinner rolls.

2) step two, sift flour
In a separate bowl, use a sifter to sift together bread flour and all-purpose flour. Sifting the flours helps remove any lumps and ensures an even texture in your dough, which is crucial for achieving soft, airy Texas Roadhouse-inspired rolls. The combination of both flours creates the perfect balance of structure and tenderness, giving your rolls a light, fluffy texture. Add salt and mix with a whisk.

3) step three, wet ingredients
Next, add butter, egg, and the frothy yeast mixture to the sifted bread flour and all-purpose flour. The butter adds richness and a soft texture to the dough, while the egg helps bind the ingredients together, ensuring a smooth dough. The yeast mixture infuses the dough with flavor and helps it rise, creating the perfect foundation for soft, fluffy dinner rolls.

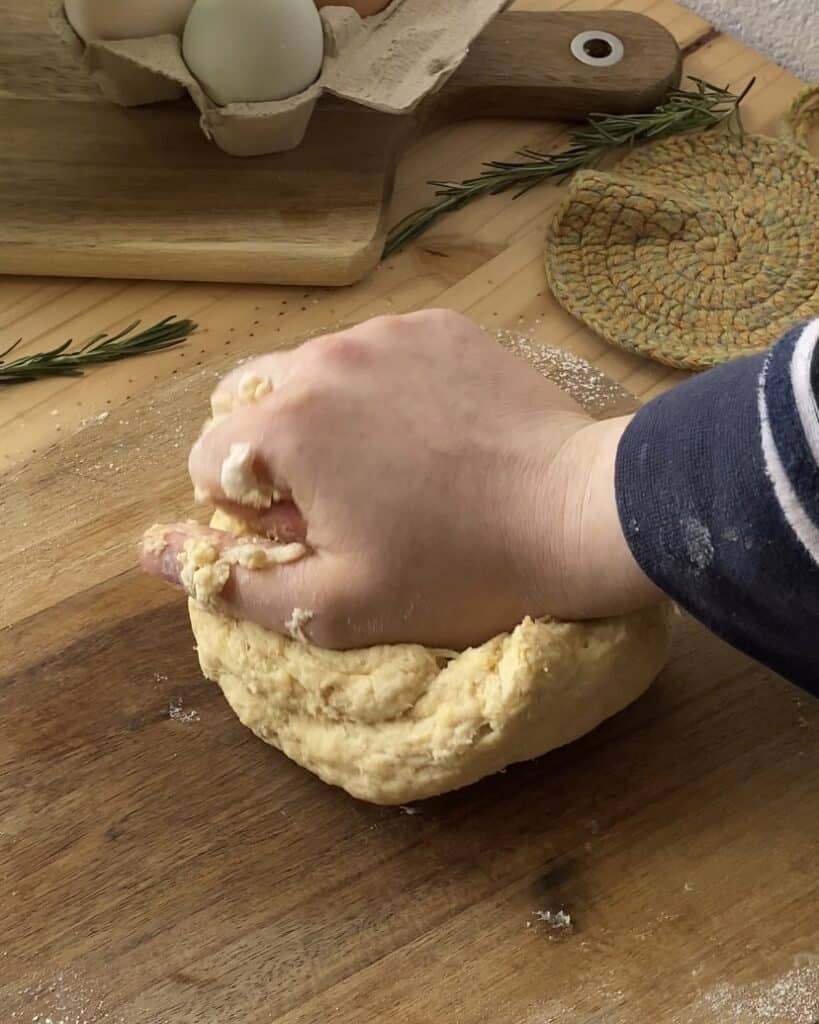
4) step four, knead the dough
To knead the dough, start by using a stand mixer with a dough hook attachment. Set the mixer on low speed and knead the dough for about 10 minutes until it becomes smooth and elastic. If you’re kneading by hand, transfer the dough to a lightly floured surface and use your hands to push the dough down and away from you, then fold it back over itself. Turn the dough a quarter turn and repeat the process. Knead for about 15 minutes until the dough is soft, smooth, and stretchy

5) step five, first proof
After kneading the dough, place it in a lightly greased bowl, covering it with a clean kitchen towel or plastic wrap. Let the dough proof in a warm area for about 1 hour and 30 minutes. During this time, the dough should double in size as the yeast works to create air pockets, ensuring your rolls will be light and fluffy.

6) step six, roll out the dough
Once the dough has finished proofing and has doubled in size, transfer it to a lightly floured surface. Using a rolling pin, roll out the dough into a rectangle shape, making sure the edges are even for uniform-sized dinner rolls. Roll the dough to about 1/2-inch thickness, ensuring it’s not rolled too thin, as this could affect the texture of your rolls. The rectangular shape makes it easier to cut the dough into even portions, ensuring consistent baking and perfectly shaped rolls.

7) step seven, fold and cut the rolls
After rolling the dough into a rectangle, make one long cut down the center to divide the dough into two long strips. Then, take each long strip and cut it into squares, ensuring each square is roughly the same size for even baking. Gently press down on the squares with the rolling pin to help them stay together, but avoid pressing too hard to maintain the soft texture of the dinner rolls.


8) step eight, second proof of the dough
Once you’ve cut the dough into squares, place them on a greased baking pan, ensuring they are spaced slightly apart to allow room for expansion as they rise. Cover the pan with plastic wrap and let the dough proof again for about 30 minutes. During this time, the rolls will puff up and rise, becoming light and airy, ready for baking. Make sure to let them rise in a warm, draft-free area for the best results.


9) step nine, bake them
Preheat the oven to 190°C (375°F). While the oven is heating, brush the rolls with a mixture of beaten egg and a little heavy cream. This will give the rolls a golden, shiny finish as they bake. Once the rolls are brushed, place the pan in the preheated oven and bake for 20 to 25 minutes, or until the rolls are golden brown and fully cooked through. After baking, brush the rolls with melted butter for a rich, buttery finish and extra softness.

11) step eleven, honey cinnamon butter
To make the Texas Roadhouse cinnamon butter, start by softening unsalted butter at room temperature. Once softened, beat the butter until smooth and creamy. Add cinnamon, powdered sugar, and honey to the butter. Continue mixing until all ingredients are well combined, creating a smooth and fluffy texture. The sweet cinnamon butter should have a rich, spreadable consistency, perfect for topping your freshly baked dinner rolls.

The best Texas Roadhouse rolls with cinnamon butter
Copycat Texas Roadhouse Rolls Recipe: Soft, Fluffy, and Irresistible!
- Total Time2 hours 40 minutes
- Yield10 Rolls
Ingredients
texas roadhouse rolls
- 90 ml warm milk
- 1 1/2 tablespoons honey
- 2 teaspoons active dry yeast
- 150 g bread flour
- 100 g all purpose flour
- 20 g room temperature butter
- 1 egg
- 1/2 teaspoon salt
egg wash for the rolls
- 1 egg
- 1 tablespoon heavy cream
cinnamon butter
- 100 g soft butter
- 50 g powdered sugar
- 1 teaspoon cinnamon
- 1 tablespoon honey
Instructions
step one, yeast mixture
- To start, warm milk in a small bowl until it reaches about 110°F (warm to the touch but not hot). Add active dry yeast and stir in honey. The warmth helps activate the yeast, while the honey helps and adds a subtle sweetness that enhances the flavor of the Texas Roadhouse rolls. Let the mixture sit for 5-10 minutes until it becomes frothy and bubbly, signaling that the yeast is active and ready to rise, setting the foundation for soft, fluffy dinner rolls.
step two, sift flour
- In a separate bowl, use a sifter to sift together bread flour and all-purpose flour. Sifting the flours helps remove any lumps and ensures an even texture in your dough, which is crucial for achieving soft, airy Texas Roadhouse-inspired rolls. The combination of both flours creates the perfect balance of structure and tenderness, giving your rolls a light, fluffy texture. Add salt and mix with a whisk.
step three, wet ingredients
- Next, add butter, egg, and the frothy yeast mixture to the sifted bread flour and all-purpose flour. The butter adds richness and a soft texture to the dough, while the egg helps bind the ingredients together, ensuring a smooth dough. The yeast mixture infuses the dough with flavor and helps it rise, creating the perfect foundation for soft, fluffy dinner rolls.
step four, knead the dough
- To knead the dough, start by using a stand mixer with a dough hook attachment. Set the mixer on low speed and knead the dough for about 10 minutes until it becomes smooth and elastic. If you’re kneading by hand, transfer the dough to a lightly floured surface and use your hands to push the dough down and away from you, then fold it back over itself. Turn the dough a quarter turn and repeat the process. Knead for about 15 minutes until the dough is soft, smooth, and stretchy
step five, first proof
- After kneading the dough, place it in a lightly greased bowl, covering it with a clean kitchen towel or plastic wrap. Let the dough proof in a warm area for about 1 hour and 30 minutes. During this time, the dough should double in size as the yeast works to create air pockets, ensuring your rolls will be light and fluffy.
step six, roll out the dough
- Once the dough has finished proofing and has doubled in size, transfer it to a lightly floured surface. Using a rolling pin, roll out the dough into a rectangle shape, making sure the edges are even for uniform-sized dinner rolls. Roll the dough to about 1/2-inch thickness, ensuring it’s not rolled too thin, as this could affect the texture of your rolls. The rectangular shape makes it easier to cut the dough into even portions, ensuring consistent baking and perfectly shaped rolls.
step seven, fold and cut the rolls
- After rolling the dough into a rectangle, make one long cut down the center to divide the dough into two long strips. Then, take each long strip and cut it into squares, ensuring each square is roughly the same size for even baking. Gently press down on the squares with the rolling pin to help them stay together, but avoid pressing too hard to maintain the soft texture of the dinner rolls.
step eight, second proof of the dough
- Once you’ve cut the dough into squares, place them on a greased baking pan, ensuring they are spaced slightly apart to allow room for expansion as they rise. Cover the pan with plastic wrap and let the dough proof again for about 30 minutes. During this time, the rolls will puff up and rise, becoming light and airy, ready for baking. Make sure to let them rise in a warm, draft-free area for the best results.
step nine, bake them
- Preheat the oven to 190°C (375°F). While the oven is heating, brush the rolls with a mixture of beaten egg and a little heavy cream. This will give the rolls a golden, shiny finish as they bake. Once the rolls are brushed, place the pan in the preheated oven and bake for 20 to 25 minutes, or until the rolls are golden brown and fully cooked through. After baking, brush the rolls with melted butter for a rich, buttery finish and extra softness.
step ten, honey cinnamon butter
- To make the Texas Roadhouse cinnamon butter, start by softening unsalted butter at room temperature. Once softened, beat the butter until smooth and creamy. Add cinnamon, powdered sugar, and honey to the butter. Continue mixing until all ingredients are well combined, creating a smooth and fluffy texture. The sweet cinnamon butter should have a rich, spreadable consistency, perfect for topping your freshly baked dinner rolls.
- Prep Time: 20 minutes
- Cook Time: 20 minutes
Nutrition
- Calories: 238
- Sugar: 10
- Sodium: 211
- Fat: 12
- Saturated Fat: 7
- Carbohydrates: 29
- Fiber: 1
- Protein: 5
- Cholesterol: 61
ARCHER'S FOOD
Easy and delicious recipes