
If you’re a fan of creamy, indulgent desserts, this No-Bake Biscoff Cheesecake will quickly become your favorite treat. This recipe, made with Biscoff cookies and a touch of gelatin, offers the perfect balance of creamy texture and irresistible flavor. The smooth, silky filling combined with the crunchy cookie crust makes this cheesecake a true showstopper for any occasion. The best part? You don’t need an oven to prepare this dessert, making it a simple and fuss-free option for those who crave a delicious dessert without the extra hassle.
Perfect for any special occasion or simply a sweet treat to enjoy at home, this no-bake cheesecake with Biscoff spread offers a decadent indulgence that everyone will love. Keep reading for detailed instructions, tips, and a step-by-step guide on how to make this Biscoff cheesecake with cookie crust.
Why This No-Bake Biscoff Cheesecake is a Must-Try
This Biscoff cheesecake recipe has quickly gained popularity thanks to its rich flavor and easy preparation. With the signature caramelized flavor of Lotus Biscoff cookies, this no-bake cheesecake with Biscoff spread delivers a taste that’s simply unforgettable. Here’s why this cheesecake will become a staple in your recipe collection:
- Easy to Make: This dessert requires no baking, making it the perfect option for beginners and busy bakers.
- Perfect for Any Occasion: Whether you’re preparing for a dinner party or a casual gathering, this no-bake Biscoff cheesecake is guaranteed to impress.
- Creamy and Luscious: The combination of a buttery Biscoff cookie crust and smooth, creamy filling results in a cheesecake that’s perfectly textured.
- Gelatin for Stability: Adding gelatin helps the cheesecake hold its shape without compromising on its creamy texture.
Biscoff Cheesecake with Lotus Cookies
Made with Lotus Biscoff cookies, this cheesecake’s base is as delicious as the filling. These cookies lend a unique caramelized flavor that complements the smoothness of the cream cheese filling. The cookie crust not only adds flavor but also provides the perfect crunch that balances out the cheesecake’s creamy texture.
List of ingredients needed to make a Biscoff no bake cheesecake
- Biscoff cookies: Used for the crust and decoration, adding a crunchy, spiced flavor to your cheesecake.
- Melted butter: Helps bind the Biscoff cookies together to create a firm, flavorful crust.
- Biscoff spread: Adds a creamy, rich layer of flavor to the cheesecake filling and decoration.
- Cream cheese: Provides a smooth, creamy texture for the cheesecake filling.
- Yogurt: Adds a slight tanginess to balance the sweetness of the cheesecake.
- Gelatin: Helps set the cheesecake and gives it the perfect texture without baking.
- Powdered sugar: Sweetens the cheesecake filling, ensuring a smooth consistency.
- Condensed milk: Adds extra sweetness and creaminess to the cheesecake filling.
- Heavy whipped cream: Provides lightness and a smooth, airy texture to the cheesecake filling.

Tips for Making the Perfect No-Bake Biscoff Cheesecake
- Dissolve Gelatin Properly: To dissolve the gelatin, microwave the yogurt until it’s warm, or gently heat the heavy cream until it simmers. This will help the gelatin melt evenly.
- Storing the Cheesecake: Keep your cheesecake refrigerated at all times to maintain its freshness. If you need to store leftovers, place them in an airtight container in the fridge for up to 3 days.
- Freezing the Cheesecake: For long-term storage, freeze your no-bake Biscoff cheesecake for up to 3-4 months. Ensure it’s stored in a sealed container to preserve its texture.
- Crust Options: Feel free to use other types of cookies for the crust, such as digestive biscuits. You don’t need to stick with one specific brand.
- Decoration Ideas: Skip the elaborate decoration and instead crumble a few Biscoff cookies on top for a simple, crunchy topping.
Gelatin tips for your Biscoff No-bake cheesecake
When preparing this cheesecake be aware that the texture may not always apear as expected. During our initial attempt, we used half the recommended amount of gelatin sheets. Unfortunately, after just five minutes in warm weather the. Cheesecake began to melt. Form this experience we concluded that adding a few more gelatin sheets can enhance stability.
To maintain the integrity of your lotus Biscoff cheesecake always refrigerate any leftovers after serving to prevent it from losing its Form. Additionally while it’s possible to substitute gelatin with other gelling agents such as agar agar I haven’t personally tested this alternative. Therefore i cannot guarantee that the results would be identical.
Freezing and storage tips for your No-Bake biscoff cheesecake
You can freeze your Biscoff no-bake cheesecake for a duration of 3 to 4 months, making it a convenient option for future enjoyment. Nevertheless, it’s advisable not to exceed this time frame in the freezer to ensure the best preservation of your Biscoff cheesecake‘s creamy texture and flavor.
To ensure the best preservation, store the no-bake cheesecake in a sealed container designed to withstand low temperatures. For short-term storage, keep the cheesecake in the refrigerator for no longer than 3 days. Given that this recipe includes dairy products, they can spoil quickly, so prompt consumption is recommended for the best taste and texture.
Versatile cookie crust options for your Biscoff no bake cheesecake
This No-Bake Biscoff Cheesecake is perfect for anyone looking for an easy, creamy, and decadent dessert. Whether you’re a fan of Lotus Biscoff cookies or simply looking for a no-bake dessert recipe, this cheesecake will not disappoint. With its smooth texture, irresistible flavor, and no-bake simplicity, it’s the perfect dessert for any occasion. Don’t forget to try out some of our variations, and be sure to share this recipe with your friends and family!
Looking for more delicious cheesecake recipes? Explore our blog for more no-bake and baked cheesecake ideas, including Biscoff cheesecake bars, cheesecake with homemade raspberry jam, and many other mouthwatering treats.

FAQ for No bake Biscoff cheesecake
No, gelatin is essential for setting the cheesecake and ensuring it holds its shape without baking. If you prefer a different gelling agent, you can try agar-agar, but results may vary.
Yes! You can use any cookie you prefer for the crust, like digestive biscuits or graham crackers, but Biscoff cookies provide a unique spiced flavor that complements the cheesecake.
For best results, refrigerate the cheesecake for at least 4 hours, but overnight is ideal. This allows the flavors to meld and the cheesecake to set properly.
Yes, you can freeze the cheesecake for up to 3–4 months. Just be sure to store it in an airtight container to preserve its texture and flavor.
Store any leftover cheesecake in an airtight container in the refrigerator for up to 3 days to maintain its freshness. For long-term storage, freeze it for up to 3–4 months.
Absolutely! You can top the cheesecake with extra Biscoff spread, crumbled Biscoff cookies, or even whipped cream for an added indulgence.
While you can substitute with other types of cream cheese, be sure to use a full-fat version for the best creamy texture. Low-fat or reduced-fat versions may affect the consistency.
Powdered sugar is recommended as it dissolves easily, giving the cheesecake a smooth texture. If using regular sugar, it may result in a grainier texture.
Dissolving the gelatin ensures it integrates smoothly into the cheesecake filling, preventing lumps and ensuring the cheesecake sets properly.
Recipe to make No bake Biscoff cheesecake
Recipe in cups and grams. You can find the cup measurements in the printable recipe scrolling down at the end.
Ingredients
cookie crust
- 200 grams lotus biscoff
- 60 grams melted butter
cheesecake
- 100 grams yogur
- 200 grams biscoff lotus spread
- 75 grams powdered sugar
- 4 gelatin sheets
- 300 grams heavy whipping cream
- 450 grams cream cheese
- 30 grams condensed milk
decorate
- 23 lotus biscoff
- 150 grams lotus biscoff spread
step by step to make a Biscoff cheesecake
1)First step, prepare the cookie crust
Crush the Biscoff cookies into fine crumbs using a food processor or rolling pin. Melt the butter carefully, either in the microwave or on the stove. Combine the melted butter with the crushed Biscoff cookies for a flavorful, buttery cookie crust. Press the mixture firmly into your pan to create a smooth, even layer, ensuring a sturdy base for your no-bake Biscoff cheesecake. This delicious Biscoff cookie crust gives your cheesecake the perfect crunchy foundation, while enhancing the overall flavor with the rich, spiced taste of Biscoff biscuits.


2)Second step, heavy whipping cream
Start by filling a bowl with cold water and submerging the gelatin sheets to soften.
In a separate bowl, whisk the heavy whipping cream using a hand whisk or stand mixer with the whisk attachment. Be careful not to over-mix; you’re aiming for a light, airy texture.
Next, warm half of the yogurt in the microwave until it’s slightly warm, then mix it with the softened gelatin sheets until fully dissolved. This ensures the gelatin blends smoothly into the cheesecake mixture, helping create a creamy texture for your No-Bake Biscoff Cheesecake.


3)Third step, Combine the ingredients
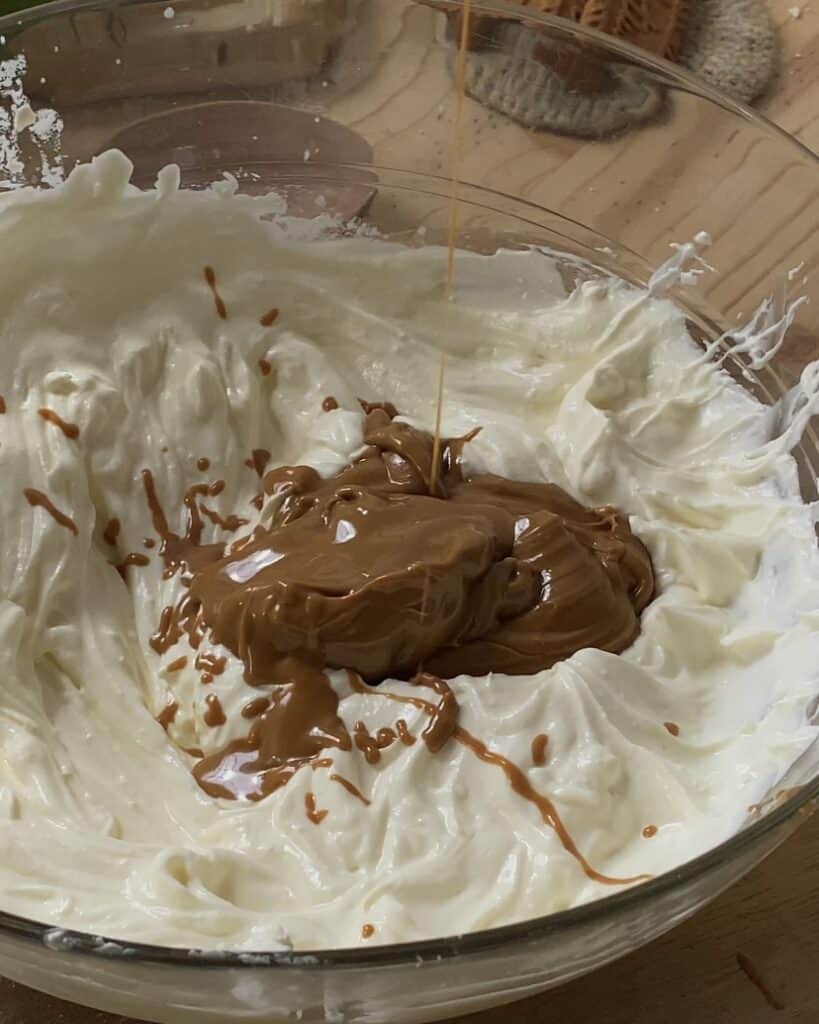
In a large mixing bowl, add the following ingredients to the warmed yogurt: cream cheese, Biscoff spread (microwaved for about 20 seconds for a smooth consistency), powdered sugar, and condensed milk.
Carefully incorporate the remaining yogurt into the mixture, using a whisk or spatula to mix everything together until you achieve a creamy and smooth texture for your No-Bake Biscoff Cheesecake.
4)Forth step, fold whipped cream
Now, incorporate the whipped cream into your No-Bake Biscoff Cheesecake batter. Start by adding half of the whipped cream to the creamy mixture. Gently fold it in with a spatula, ensuring you maintain the light and airy texture.
Add the remaining whipped cream to the batter, and carefully fold it in until everything is evenly combined. Be cautious not to overmix, as this can deflate the whipped cream and affect the cheesecake’s lightness.

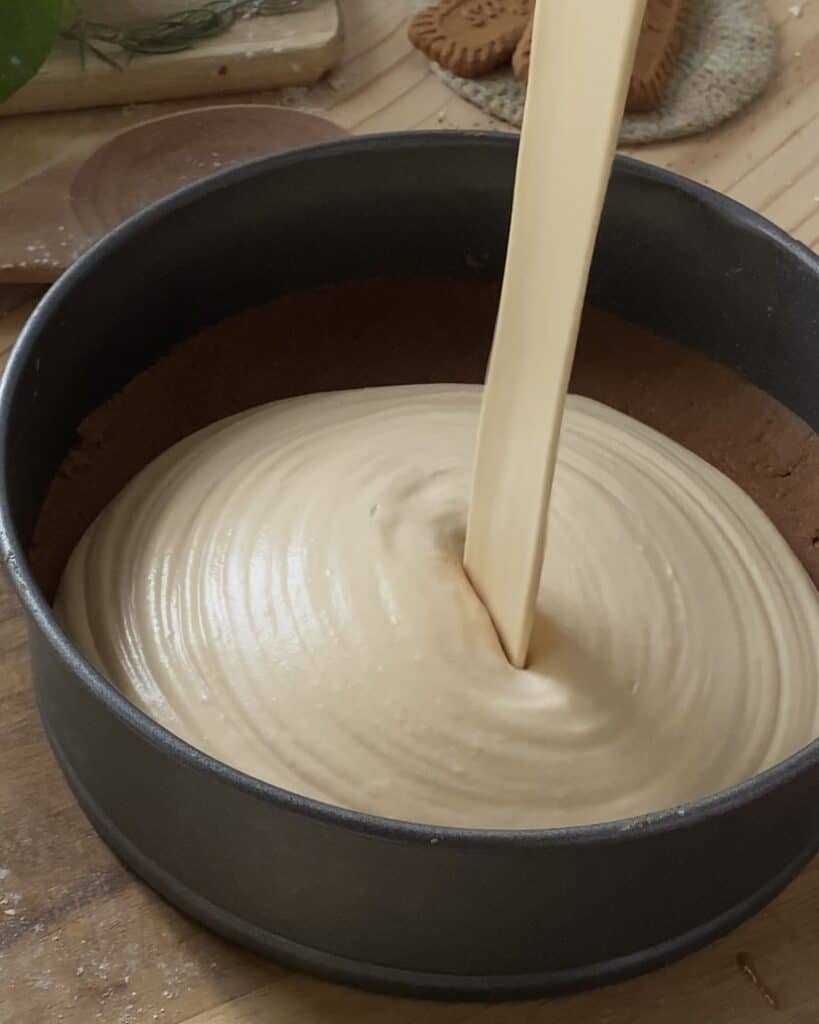
5)Fifth step, pour into the cookie crust
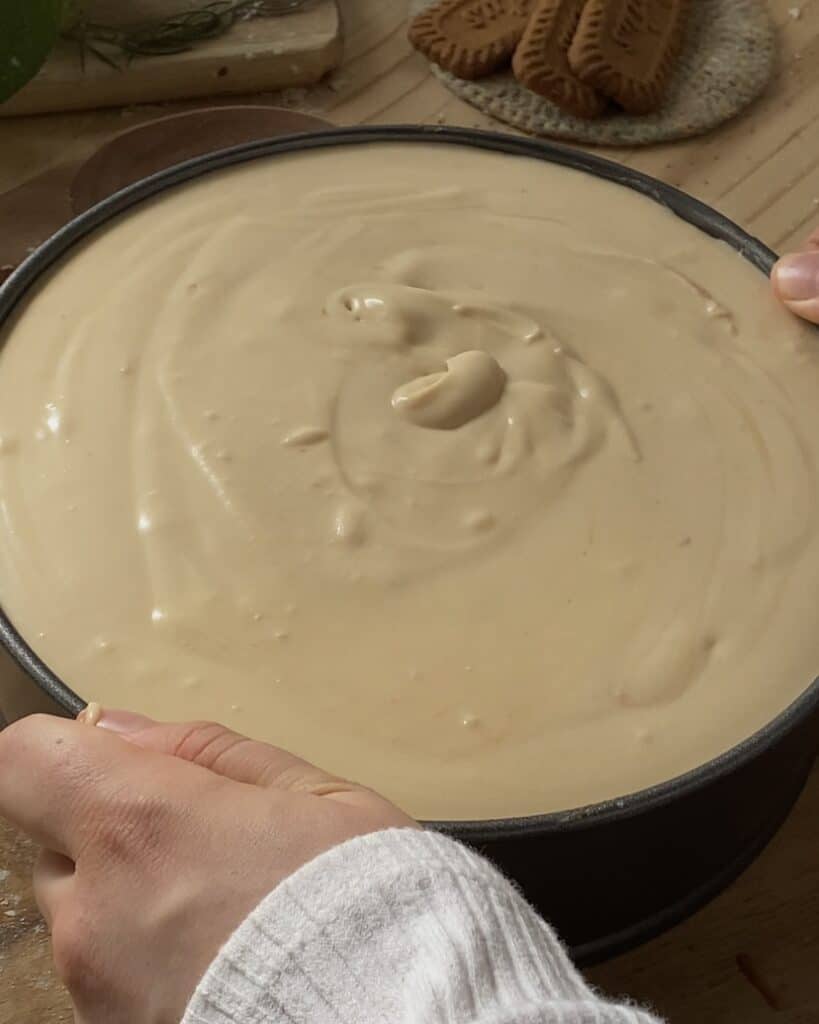
Now that your cheesecake batter is ready, pour it into the prepared cookie crust. Carefully transfer the batter into the mold, ensuring an even distribution.
To remove any air bubbles, gently tap or shake the mold after pouring. Once the batter is smooth, place the mold in the refrigerator and allow the cheesecake to chill overnight to fully set.
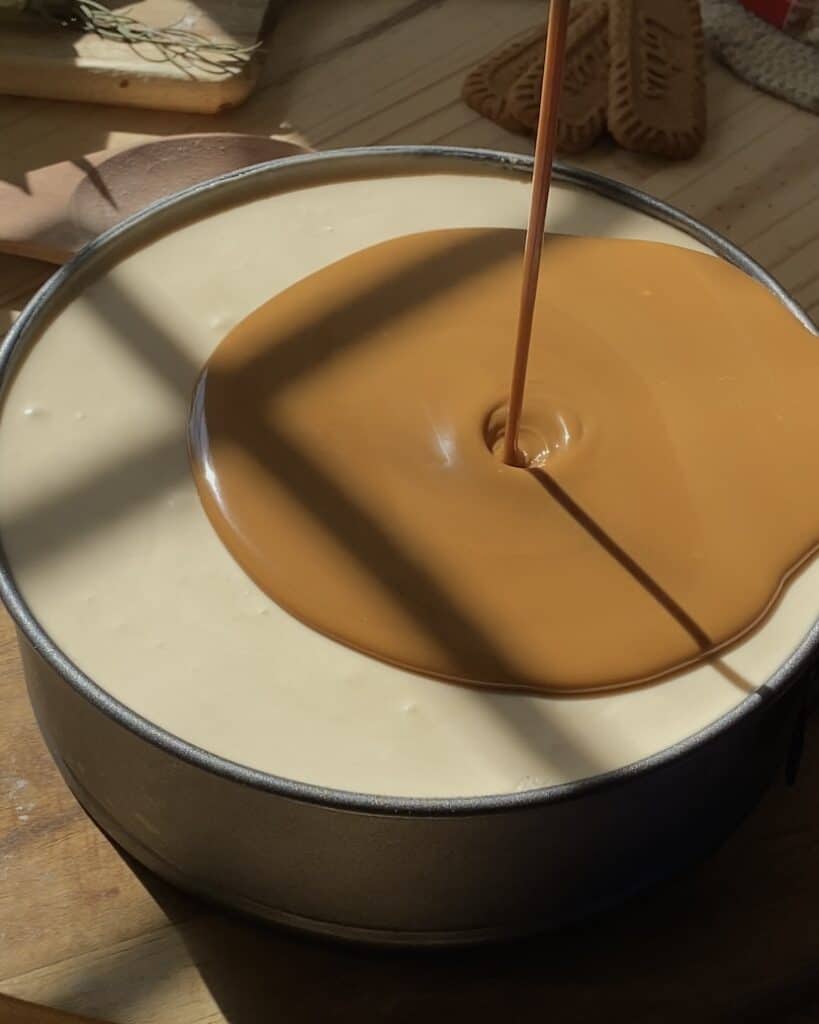
6)Sixth step, decorate the cheesecake
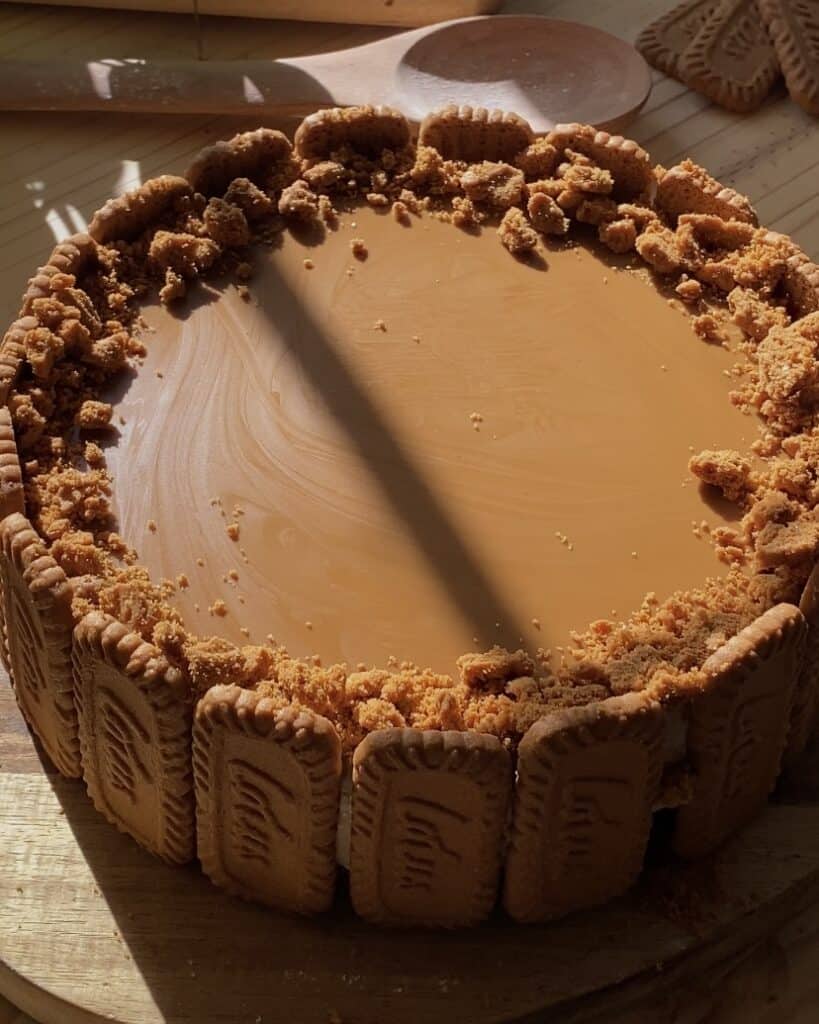
Firstly, microwave the Biscoff spread for about 20 seconds to achieve a smooth and pourable consistency. Then, spread it evenly over the top of the cheesecake. It’s essential to mix the Biscoff spread thoroughly to avoid any uneven appearance with visible patches of different colors. Once the spread is well-blended, pour it evenly on top of the cheesecake, smoothing it out to cover the entire surface. Afterward, place the cheesecake back into the fridge for an additional 10 minutes to allow the Biscoff layer to set perfectly before serving.
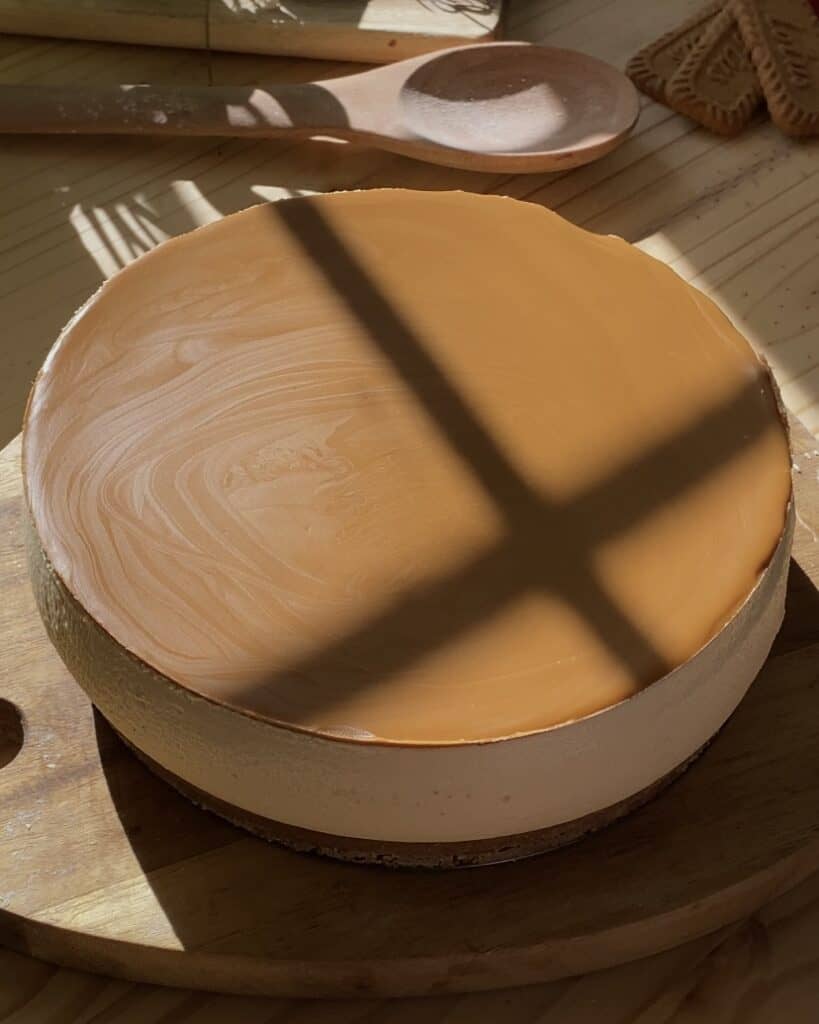
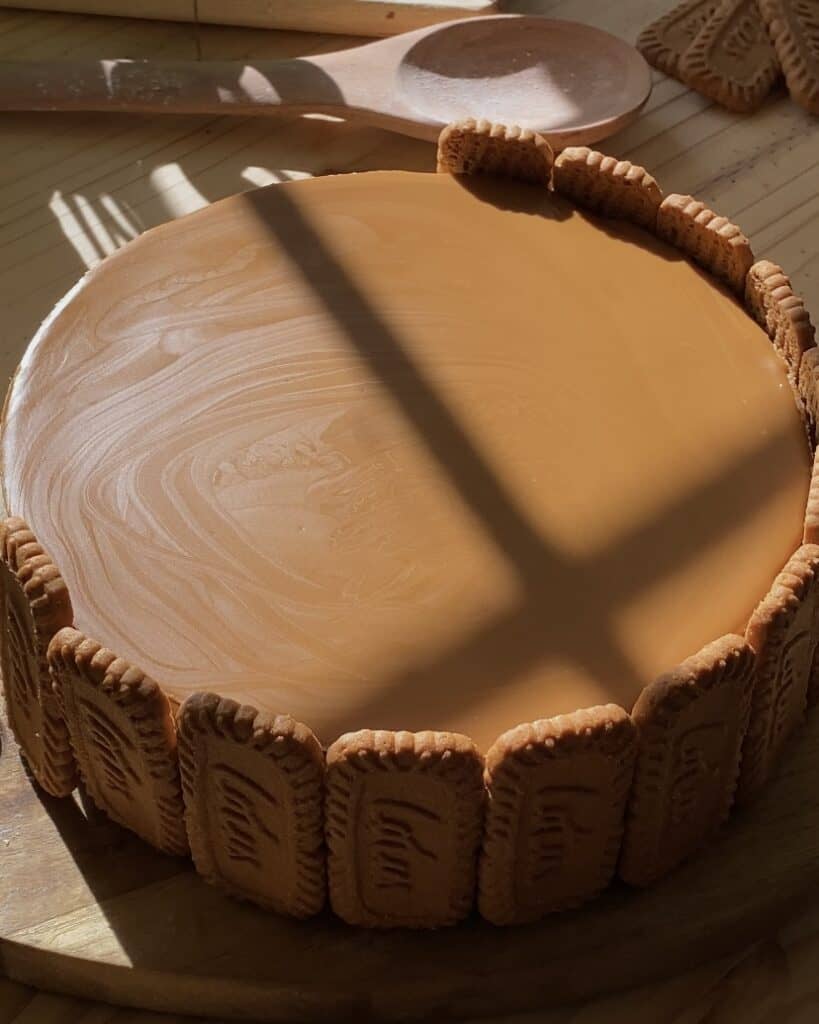
7)Seventh step, add the decorative biscuits
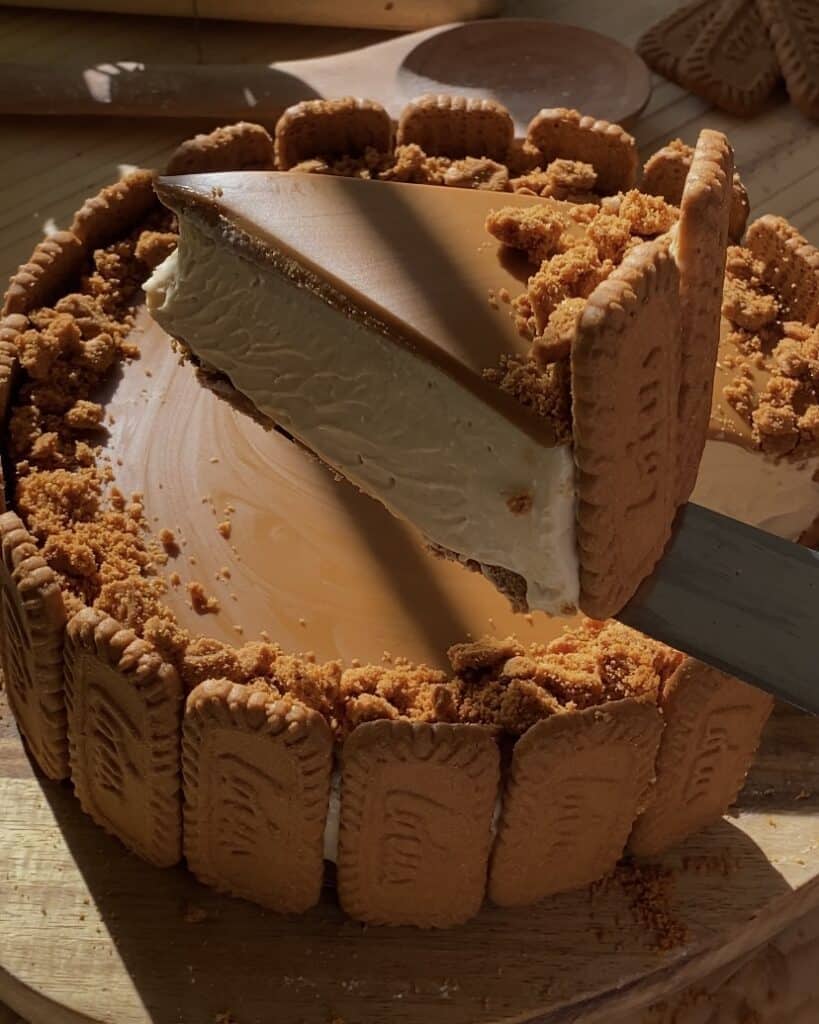
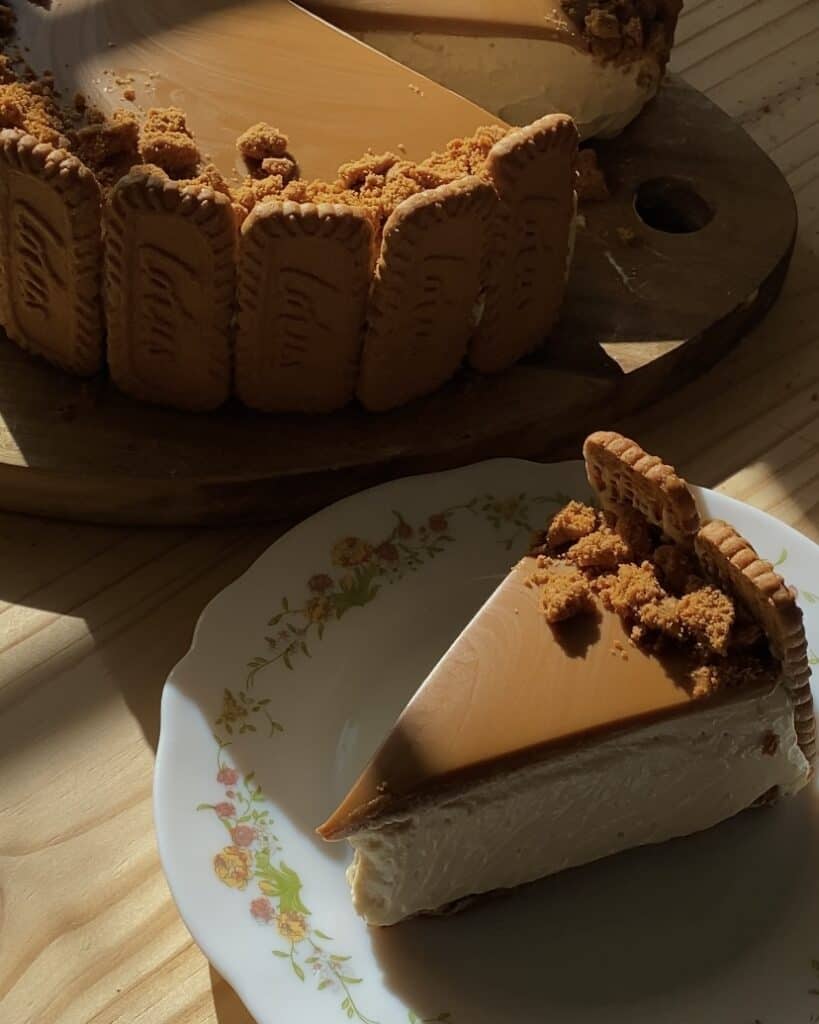
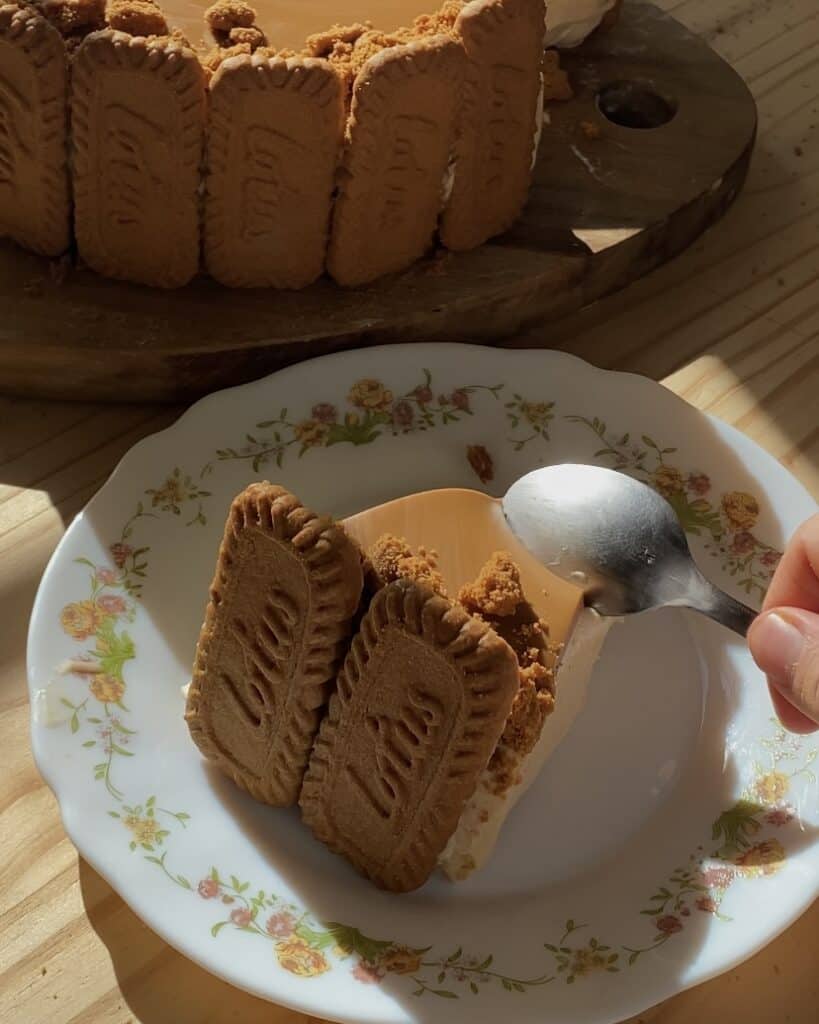
Now that your cheesecake is set, it’s time to decorate! Start by placing whole Biscoff cookies around the sides of the cheesecake to give it an elegant and flavorful finish. Next, take a few more cookies, crumble them up, and sprinkle them generously over the top to add a delightful crunch. This will not only enhance the flavor of your cheesecake but also provide an appealing texture contrast.
Finally, serve your beautifully decorated No-Bake Biscoff Cheesecake and enjoy every creamy, flavorful bite!

No-bake Biscoff Cheesecake
- Prep Time: 40 minutes
- Total Time: 7 hours 40 minutes
- Yield: 8 Portions
Description
If you’re a fan of creamy, indulgent desserts, this No-Bake Biscoff Cheesecake will quickly become your favorite treat. This recipe, made with Biscoff cookies and a touch of gelatin, offers the perfect balance of creamy texture and irresistible flavor.
Ingredients
cookie crust
- 200 grams lotus biscoff
- 60 grams melted butter
cheesecake
- 100 grams yogur
- 200 grams biscoff lotus spread
- 75 grams powdered sugar
- 4 gelatin sheets
- 300 grams heavy whipping cream
- 450 grams cream cheese
- 30 grams condensed milk
decorate
- 23 lotus biscoff
- 150 grams lotus biscoff spread
Instructions
1)First step, prepare the cookie crust
- Crush the Biscoff cookies into fine crumbs using a food processor or rolling pin. Melt the butter carefully, either in the microwave or on the stove. Combine the melted butter with the crushed Biscoff cookies for a flavorful, buttery cookie crust. Press the mixture firmly into your pan to create a smooth, even layer, ensuring a sturdy base for your no-bake Biscoff cheesecake. This delicious Biscoff cookie crust gives your cheesecake the perfect crunchy foundation, while enhancing the overall flavor with the rich, spiced taste of Biscoff biscuits.
2)Second step, heavy whipping cream
- Start by filling a bowl with cold water and submerging the gelatin sheets to soften.
- In a separate bowl, whisk the heavy whipping cream using a hand whisk or stand mixer with the whisk attachment. Be careful not to over-mix; you’re aiming for a light, airy texture.
- Next, warm half of the yogurt in the microwave until it’s slightly warm, then mix it with the softened gelatin sheets until fully dissolved. This ensures the gelatin blends smoothly into the cheesecake mixture, helping create a creamy texture for your No-Bake Biscoff Cheesecake.
3)Third step, Combine the ingredients
- In a large mixing bowl, add the following ingredients to the warmed yogurt: cream cheese, Biscoff spread (microwaved for about 20 seconds for a smooth consistency), powdered sugar, and condensed milk.
- Carefully incorporate the remaining yogurt into the mixture, using a whisk or spatula to mix everything together until you achieve a creamy and smooth texture for your No-Bake Biscoff Cheesecake.
4)Forth step, fold whipped cream
- Now, incorporate the whipped cream into your No-Bake Biscoff Cheesecake batter. Start by adding half of the whipped cream to the creamy mixture. Gently fold it in with a spatula, ensuring you maintain the light and airy texture.
- Add the remaining whipped cream to the batter, and carefully fold it in until everything is evenly combined. Be cautious not to overmix, as this can deflate the whipped cream and affect the cheesecake’s lightness.
5)Fifth step, pour into the cookie crust
- Now that your cheesecake batter is ready, pour it into the prepared cookie crust. Carefully transfer the batter into the mold, ensuring an even distribution.
- To remove any air bubbles, gently tap or shake the mold after pouring. Once the batter is smooth, place the mold in the refrigerator and allow the cheesecake to chill overnight to fully set.
6)Sixth step, decorate the cheesecake
- Firstly, microwave the Biscoff spread for about 20 seconds to achieve a smooth and pourable consistency. Then, spread it evenly over the top of the cheesecake. It’s essential to mix the Biscoff spread thoroughly to avoid any uneven appearance with visible patches of different colors. Once the spread is well-blended, pour it evenly on top of the cheesecake, smoothing it out to cover the entire surface. Afterward, place the cheesecake back into the fridge for an additional 10 minutes to allow the Biscoff layer to set perfectly before serving.
7)Seventh step, add the decorative biscuits
- Now that your cheesecake is set, it’s time to decorate! Start by placing whole Biscoff cookies around the sides of the cheesecake to give it an elegant and flavorful finish. Next, take a few more cookies, crumble them up, and sprinkle them generously over the top to add a delightful crunch. This will not only enhance the flavor of your cheesecake but also provide an appealing texture contrast.
- Finally, serve your beautifully decorated No-Bake Biscoff Cheesecake and enjoy every creamy, flavorful bite!
Nutrition
- Calories: 961
- Sugar: 59
- Sodium: 489
- Fat: 66
- Saturated Fat: 37
- Carbohydrates: 84
- Fiber: 3
- Protein: 12
- Cholesterol: 118
ARCHER'S FOOD
Easy and delicious recipes


Wowww!!! So yummy!
👍
Thank you!
cake tiramisu nutella