
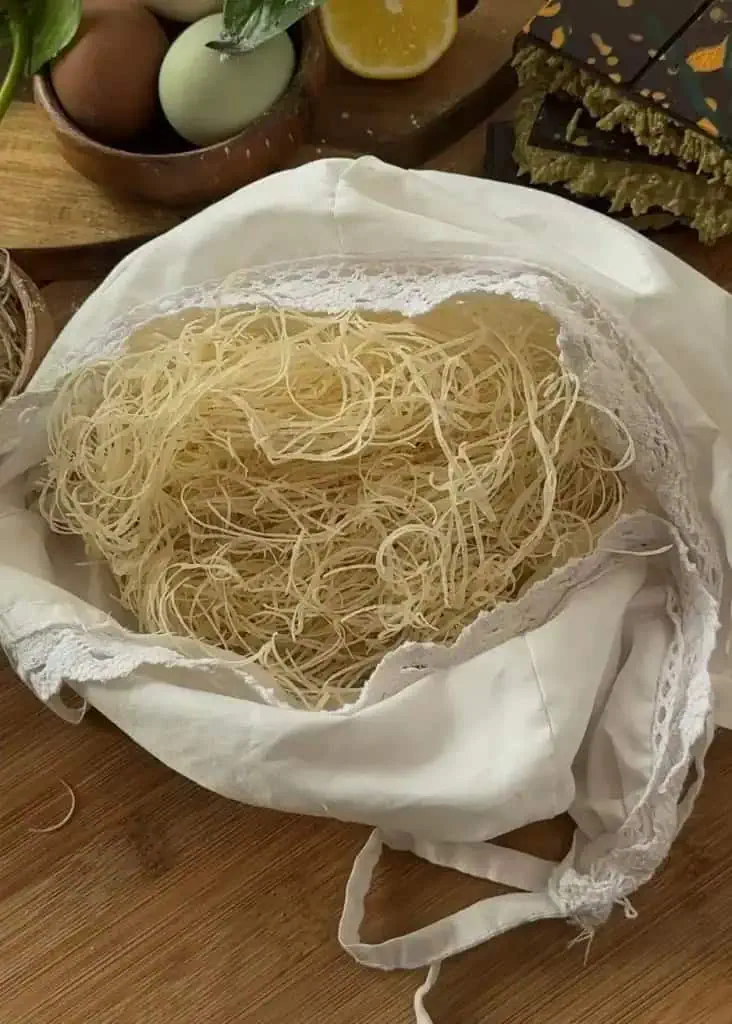
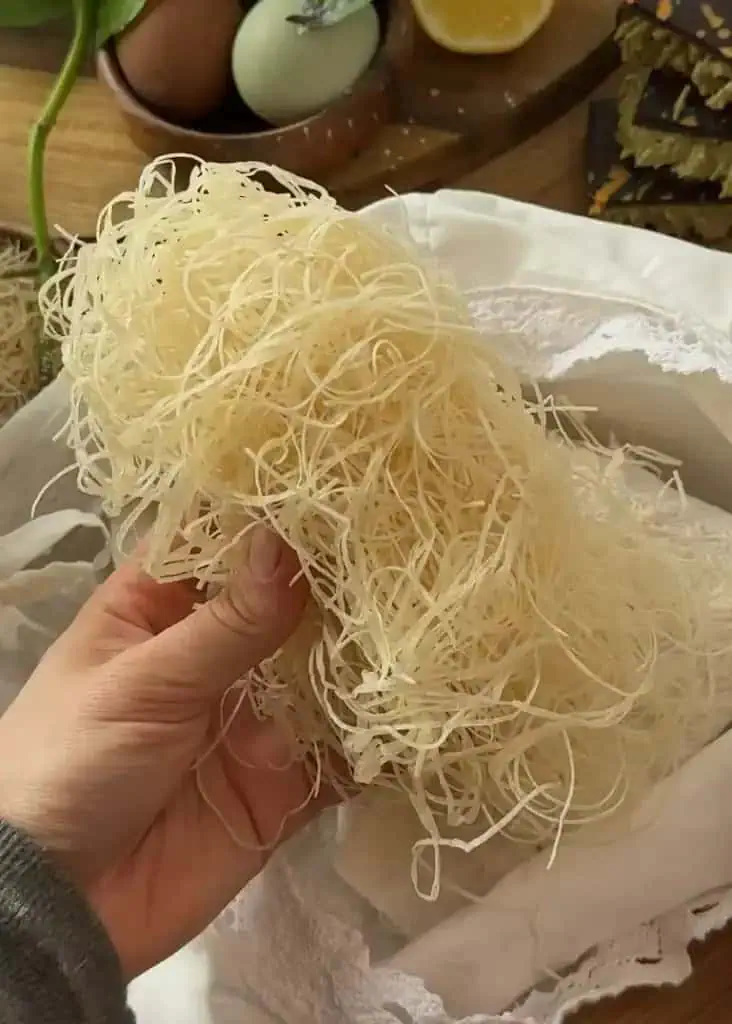
If you’ve ever dreamed of making Dubai chocolate at home but thought it was too expensive or complicated, this recipe is for you! With just 4 essential ingredients—water, all-purpose flour, cornstarch, and oil—you can create homemade kataifi that’s as good as any store-bought version. Easy to make: mix, sieve, and cook for 5 to 10 seconds per round. Plus, it’s so affordable compared to the $25 price tag for pre-made kataifi pastry.
Why You’ll Love This Recipe:
Everyone loves Dubai chocolate or wants to try it, but let’s be honest—it’s not cheap! Stores charge a fortune just for the kataifi pastry alone. But with this recipe, you can make it at home for a fraction of the cost. It’s easy, quick, and requires only 4 basic ingredients. This homemade kataifi will give your desserts the perfect crunch.
My new obsession:
I’ve been obsessed with Dubai chocolate ever since I saw it all over social media. The problem? I don’t live in Dubai, and I can’t afford to fly there just for dessert (maybe in 10 years!). So, I decided to bring Dubai to my kitchen by making my own kataifi pastry. After weeks of research and tweaking recipes, I finally perfected this easy, homemade version. Now, I use it in all my Dubai chocolate recipes.
Recipes Using Kataifi on Our Website:
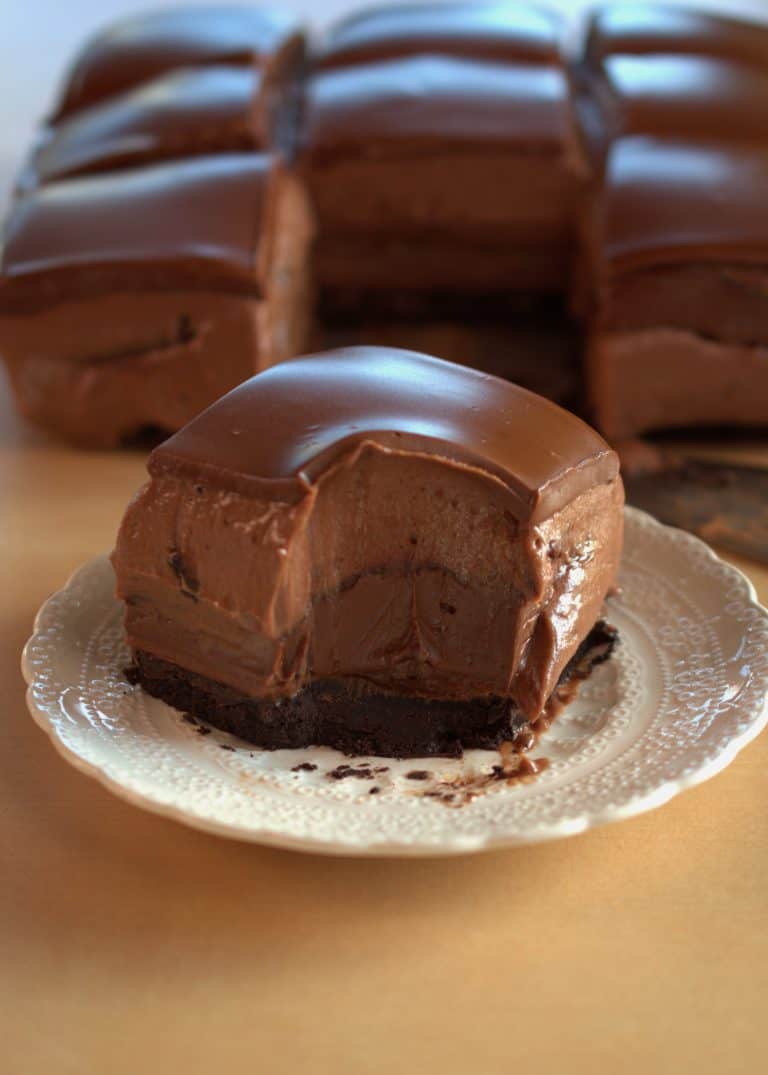
- Dubai chocolate strawberries: MILK and WHITE CHOCOLATE version
- Dubai chocolate croissants,
- Copycat Starbucks Dubai chocolate donuts
- Dubai chocolate bar
Stay tuned for more recipes because I’m officially hooked on Dubai chocolate!
Ingredients for kataifi
— All-purpose flour: The base of the kataifi, giving it structure.
— Cornstarch: Adds lightness and helps create that perfect crunch.
— Salt: Enhances the flavor.
— Neutral oil (like sunflower seed oil): Keeps the pastry tender and easy to work with.
— Water: Binds everything together for a smooth batter.
This recipe yields about 120 to 140 grams of kataifi, perfect for your Dubai chocolate creations!
Baking tools you need!
- Kitchen scale or measuring cups: For precise measurements.
- Bowl: To mix the ingredients.
- Whisk: Ensures a smooth batter.
- Spatula: Helps scrape every bit of batter.
- Sieve: For a lump-free mixture.
- Non-stick pan: Prevents sticking and ensures even cooking.
- Piping bag: Essential for creating those thin, crispy strands of kataifi.
Tips for Perfect Kataifi:
- Sieve the dry ingredients: This ensures a smooth consistency.
- Cook for 5-10 seconds only: Overcooking will make it too crispy and we don’t need that (yet!)
- Use a kitchen towel: Cover the cooked kataifi to keep it from drying out.
- Batter consistency: It should be like a thin pancake batter—don’t add more flour!
- Secure the piping bag: Use a plastic tie to prevent spills.
Common Mistakes and How to Fix Them:
- Kataifi too thick: Cut the piping bag tip as small as possible for thinner strands.
- Batter too lumpy: Sieve the mixture twice for a smoother texture.
- Overcooking: Stick to 5-10 seconds per batch to avoid burning.
FAQs about homemade kataifi recipe
Yes! Store it in the freezer in a freezer safe container for up to 3 months.
Absolutely! It works great for both sweet and savory recipes. We are gonna be posting so many exciting recipes in our website soon!
You can use a plastic bag or ziplock bag with a small corner cut off as a substitute.
You only need very basic ingredients like cornstarch, flour, water, oil and a pinch of salt.
If you try this homemade kataifi recipe, let me know how it turns out! Leave a review in the comments and tell me what recipe you made with it. Your feedback helps a lot, and I’d love to hear about your creations!
Recipe for Kataifi pastry
Recipe in cups and grams. You can find the cup measurements in the printable recipe scrolling down at the end.

Ingredients:
For 120 to 140 grams of kataifi pastry
- 100 grams all-purpose flour
- 60 grams cornstarch
- Pinch of salt
- 3 tablespoons neutral oil (like sunflower seed oil)
- 180 grams water
Step by step
- In a bowl, sieve the cornstarch, flour, and salt to ensure a smooth mixture.
- Pour in the water and oil, then mix until fully combined.
- Pass the mixture through a sieve again using a spatula to remove any lumps.
- Place a glass on the counter and put the piping bag over it for easier pouring. Use a taller glass and a larger piping bag to avoid refilling.
- Heat a non-stick pan on low heat. Pipe small circles onto the pan, starting from the center and moving outward. Keep them separate so they don’t touch. Use a spatula to remove the kataifi from the pan and place it on a kitchen towel. Cover with another towel to keep it from drying out.Continue until all the batter is used.


How to make easy kataifi for Dubai chocolate
- Prep Time: 5 minutes
- Cook Time: 35 minutes
- Total Time: 40 minutes
- Yield: 140 grams
- Category: from scratch
- Cuisine: Mediterranean
Description
If you’ve ever dreamed of making Dubai chocolate at home but thought it was too expensive or complicated, this recipe is for you! With just 4 essential ingredients—water, all-purpose flour, cornstarch, and oil—you can create homemade kataifi that’s as good as any store-bought version.
Ingredients
For 120 to 140 grams of kataifi pastry
- 100 grams all-purpose flour
- 60 grams cornstarch
- Pinch of salt
- 3 tablespoons neutral oil (like sunflower seed oil)
- 180 grams water
Instructions
- kataifi batter In a bowl, sieve the cornstarch, flour, and salt to ensure a smooth mixture.
- kataifi batter Pour in the water and oil, then mix until fully combined.
- sieve batter Pass the mixture through a sieve again using a spatula to remove any lumps.
- piping bag Place a glass on the counter and put the piping bag over it for easier pouring. Use a taller glass and a larger piping bag to avoid refilling.
- cook kataifi Heat a non-stick pan on low heat. Pipe small circles onto the pan, starting from the center and moving outward. Keep them separate so they don’t touch. Use a spatula to remove the kataifi from the pan and place it on a kitchen towel. Cover with another towel to keep it from drying out.Continue until all the batter is used.
Notes
Tips to make perfect kataifi:
Sieve the dry ingredients: This ensures a smooth consistency.
Cook for 5-10 seconds only: Overcooking will make it too crispy and we don’t need that (yet!)
Use a kitchen towel: Cover the cooked kataifi to keep it from drying out.
Batter consistency: It should be like a thin pancake batter—don’t add more flour!
Secure the piping bag: Use a plastic tie to prevent spills.
ARCHER'S FOOD
Easy and delicious recipes


Could we possibly use coconut or olive oil for the oil?
Hi Ashley!! Yes of course! I personally love olive oil for everything but use whatever you feel more comfortable using.
Should it be crispy when you remove from pan or feel like home made noodles?
Hello. No it should not be crispy, it will be more like noodles. It will become crispy after, when you fry it with the butter for the recipe for example when making Dubai chocolate, or even after a little when it dries a bit.
It will feel like soft noodles then after you make them you cut them into smaller pieces and you melt bjtter in a medium heat pan then toast them till they are golden brown.
I made this and it came out like a thin noodle. It was hard to make them as thin as I wanted. I used a plastic bag. I didn’t cut them up, added them to butter and used it in a recipe. Cutting them into small pieces would have been better and easier when mixing them with pistachio cream.
Great recipe. But yield (120 to 140 grams) is mistaken/impossible.
HI! I weight it every time and i always get from those numbers
Thanks for the answer. Even if all the water evaporated, you would get 100g (flour) + 60 (starch) + 45 (oil) = 205 grams. But all the water cannot evaporate. So you must get more than 205 g. I have done Kataifi before, you get around 2/3 of the initial weight of ingredients, i.e. around 250 g for your recipe. Regards.
Tried this recipe and was disappointed. I did not end up with beautiful long noodles like the picture, instead I got straggly little things that did not come off the pan like a pancake would. It was a ‘brittle’ mixture for want of a better word. Any thoughts on why? Recipe followed exactly
All good! The heat needed to be a little higher and it worked perfectly
Hello, I’m glad you were able to make them right!