
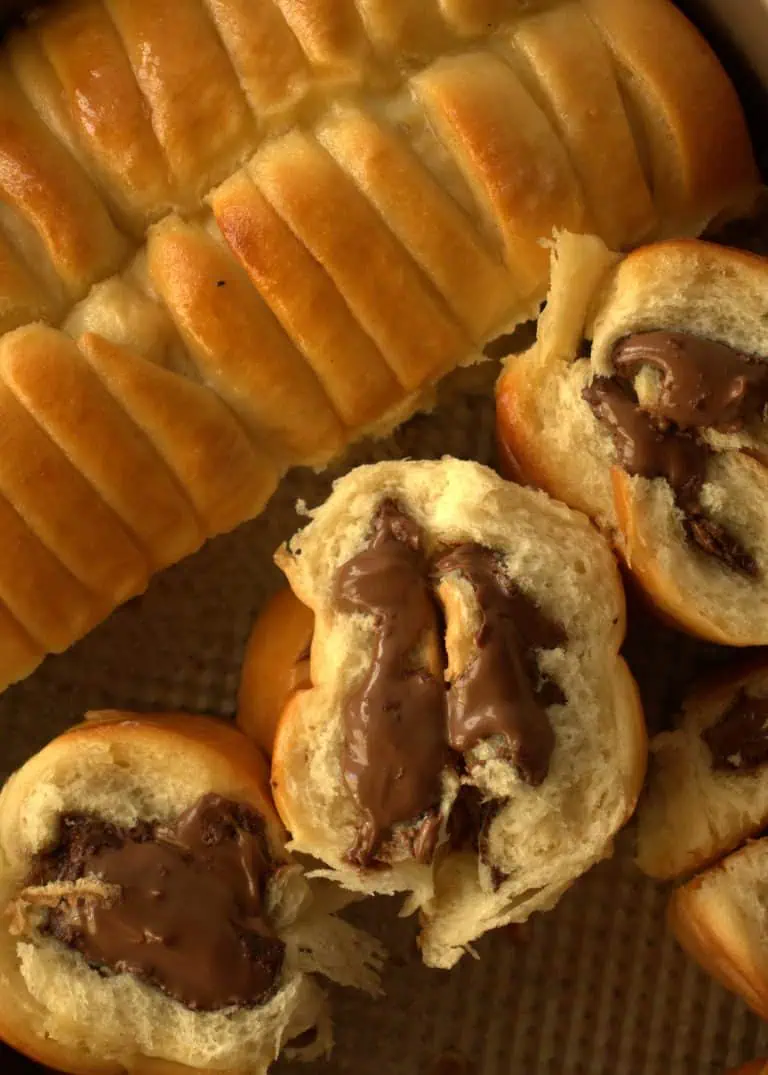
This homemade glazed donut focaccia recipe is a delightful fusion of classic old-fashioned donut dough and the beloved focaccia shape, and it’s unbelievably easy to make!
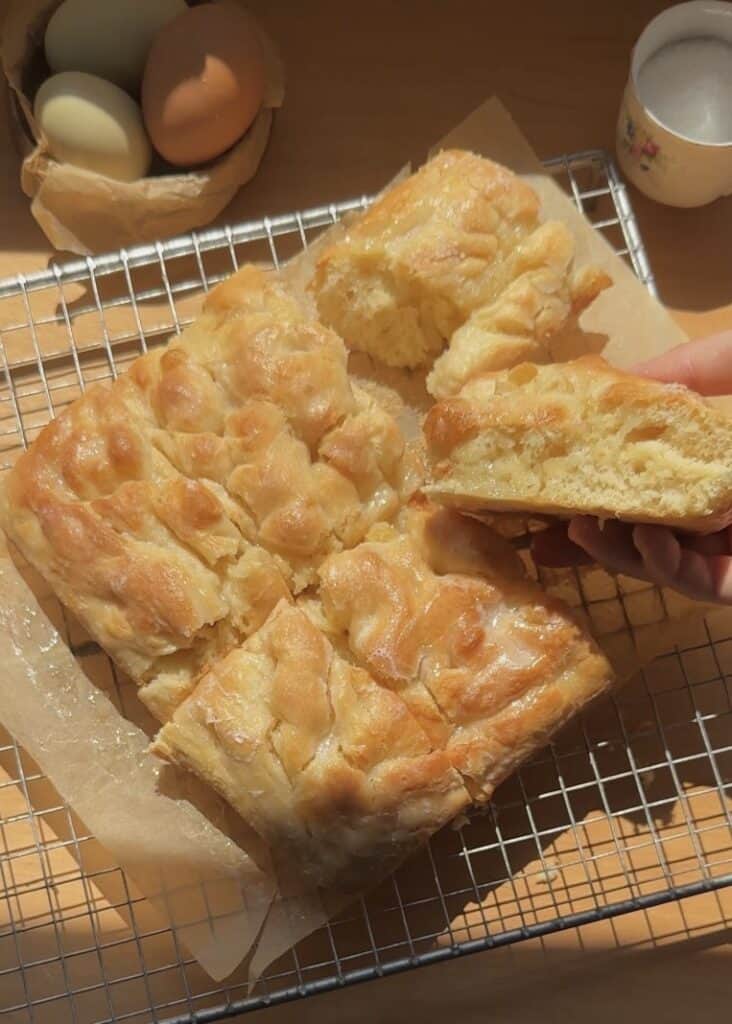
Baked to perfection, it crisps beautifully on the outside while staying fluffy, airy, and melt-in-your-mouth soft on the inside.
The pillowy dough makes each bite irresistible, and the sweet glaze on top adds just the right touch of indulgence.
Whether you serve it for brunch, dessert, or as a weekend treat, everyone will fall in love with this creative and delicious twist on two comforting favorites.
This easy donut focaccia recipe is a creative fusion of old-fashioned donut dough and classic focaccia, crisp on the outside, fluffy and pillowy on the inside, and finished with a sweet, glossy glaze.
Ideal for feeding a crowd, this recipe skips the hassle of shaping individual donuts, just pour the dough into trays and bake to golden perfection.
Homemade glazed donut focaccia
Why You’ll Love This Recipe
⭑ Unlike typical donut or bread recipes, this old-fashioned donut focaccia delivers a perfect contrast:
- crispy edges with a fluffy, airy, melt-in-your-mouth interior. The unique hybrid texture sets it apart from standard sweet breads or donuts.
❀ Forget about rolling and cutting individual donuts. This is a tray-bake method, making it ideal for beginners or anyone cooking for a crowd. Simply spread the dough into a pan, let it rise, and bake, no extra fuss.
⭑ Because it’s made in large trays, this recipe is perfect for serving at brunches, birthdays, baby showers, or holiday mornings. It looks impressive, but it’s incredibly simple to prepare and serve.
❀ Sweet focaccia with glaze that adds just the right amount of indulgence. The shiny, sugary finish enhances the flavor and gives it a bakery-style appeal that stands out online and on the table.

Grab These Ingredients
- Granulated sugar: Sweetens the dough gently, feeds the yeast for a better rise, and encourages a golden, crisp finish.
- Powdered sugar: Used only for the glaze, it dissolves smoothly to create a glossy, classic donut-style topping.
- All-purpose flour: Provides structure while keeping the crumb soft and tender, ideal for a fluffy, pillowy dough.
- Butter: Adds richness and enhances the melt-in-your-mouth texture of the baked focaccia.
- Egg: Helps bind the dough and contributes to a fluffy, light texture with added color and tenderness.
- Milk: Used in both the dough and the glaze, it adds moisture, softness, and helps achieve a creamy glaze consistency.
- Active dry yeast: Leavens the dough by creating air pockets, giving the focaccia its signature light and airy texture.

Special Tools to Make a homemade glazed focaccia
- Mixing bowls: Essential for combining and proofing your dough, giving plenty of room for the yeast to activate and the dough to rise properly.
- Food scale: Provides precise measurements of ingredients to ensure consistent dough texture and perfect rise every time.
- Whisk: Ideal for mixing the ingredients from the glaze.
- Stand mixer: Speeds up mixing and helps create a smooth, elastic dough that will bake into a soft interior with a golden brown crispy crust. It’s really important to use one for this recipe as the dough is really sticky.
- Square pan: Used to bake the focaccia dough in one tray, allowing it to develop that classic flatbread shape and achieve a uniform melt-in-your-mouth focaccia.
- Plastic wrap: Covers the dough during rising to retain moisture and warmth, creating the perfect environment for the yeast to work and the dough to double in size.
- Sieve: Helps sift the powdered sugar to remove any clumps for the bakery-style donut focaccia.
- Cooling rack: Allows the baked focaccia to cool evenly without becoming soggy, preserving the crispness of the crust while keeping the inside soft and fluffy.

how to make glazed donut focaccia
Sponge
To make this delicious glazed donut focaccia, we start by preparing the sponge or yeast mixture, which is essential for activating the yeast and ensuring a perfect rise.
In a mixing bowl, combine warm water (make sure it’s warm, not hot, to avoid killing the yeast), granulated sugar, and active dry yeast.
Stir well until everything is fully mixed. Then, let the mixture rest for about 10 minutes. I use a dough proofing machine set at 28°C or 82°F.

After 10 minutes, you should see bubbles forming on the surface.
If your mixture is slow to bubble and doesn’t show much foam, feel free to let it rest a little longer until you see a nice layer of foam on top.

Here you can see the texture the mixture should have, it should be foamy and light enough to scoop with a spoon, resembling a frothy foam.
That’s how you know it’s ready. If your mixture hasn’t activated and looks like flat water with no bubbles, the dough will not rise, so it’s best not to continue with it.
There are several reasons why this might happen.
The most common cause is the yeast: it could be expired, dead, or the package has been opened for too long. Even if the yeast isn’t expired, once the seal is broken, it can lose its effectiveness over time.
Additionally, if the water is too cold or too hot, the yeast won’t activate properly.

If this occurs, the best option is to try again with new active dry yeast mixture or purchase a new package and start over. This step is crucial for ensuring your dough rises perfectly and your glazed donut focaccia turns out delicious.
dough
Now that the yeast mixture is perfectly activated and bubbly, it’s time to add the rest of the ingredients that will transform it into a rich, flavorful dough.
Begin by adding one fresh egg and milk to the sponge for this fluffy glazed bread. After adding these ingredients, mix them thoroughly with the yeast sponge until fully combined.


Now you can add the rest of the ingredients: all-purpose flour and sugar, along with room temperature butter. Using butter at room temperature is important because it blends smoothly into the dough.
Keep in mind this dough will be quite sticky, that’s exactly how it’s meant to be. Resist the urge to add more flour, as this could make the dough too dense and tough, losing that characteristic softness of soft and tender donut bread.

Use a stand mixer with a dough hook to knead thoroughly. The mixer will handle the sticky dough better than kneading by hand.
Knead the dough for about 15 minutes on medium-low speed. This slow, steady kneading helps develop the gluten gradually, resulting in a dough that’s elastic and smooth without becoming tough.

Once the dough is kneaded, transfer it back into a clean bowl and cover it tightly with plastic wrap to prevent it from drying out.
proof the dough
I proof my dough at 28°C (82°F) using a controlled proofing machine for about 2 hours.
Keep in mind that proofing times can vary depending on temperature and other environmental factors.
If you notice the dough is rising slowly, don’t worry, just give it more time. Patience is key here! Even if it hasn’t doubled in size within those 2 hours, it can still rise beautifully with a bit more time.

Once the dough has doubled in size, gently pour it into your prepared square pan using a spatula. Spread it out evenly without deflating the dough too much.
Next, generously drizzle melted butter over the surface. This step is key to developing the rich flavor and helping create the irresistible crust that defines this crispy donut focaccia.

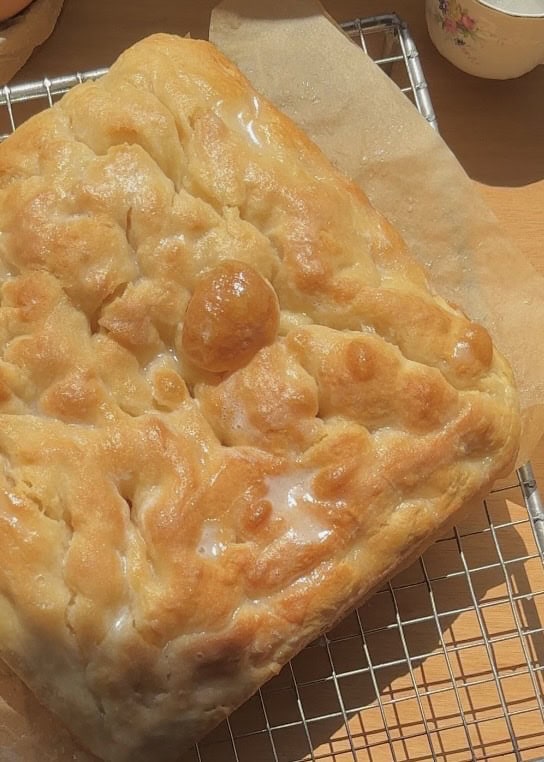
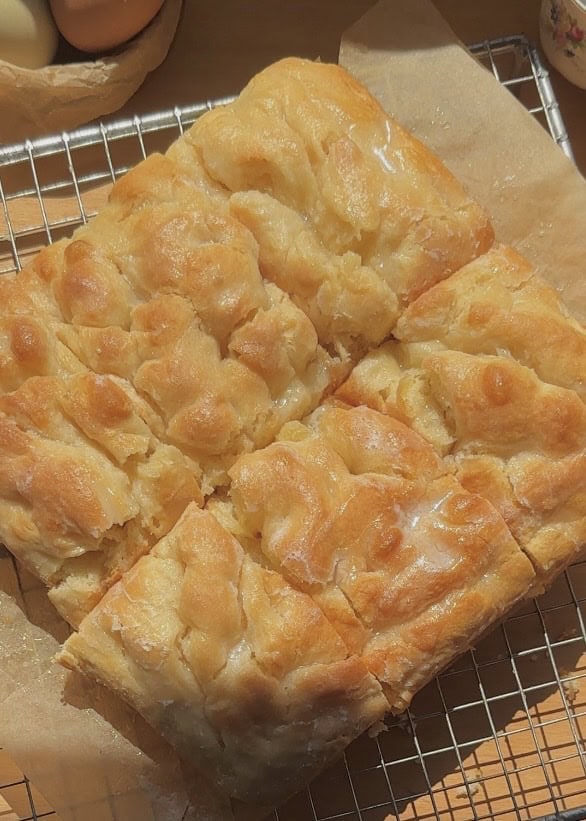
Then, using your fingers, gently press into the dough to create the signature dimples that are characteristic of focaccia.
These indentations not only give the bread its classic rustic look but also help to evenly distribute the melted butter and any glaze you’ll add later.
Press down firmly but carefully, making shallow holes all over the surface without tearing the dough
Now, you can proof the dough again for about 45 minutes at 28°C (82°F).
Using a controlled temperature method during this second proofing ensures the dough rises evenly and develops the perfect texture.
This additional rise helps create that light, airy crumb and enhances the softness that makes this soft donut bread recipe so delicious and satisfying.
Shape again
Now you want to shape the dough again by gently pressing dimples into the surface with your fingers, just like before. Be careful not to tear the dough while creating these indentations.
If you have any leftover melted butter, drizzle it generously on top of your donut-inspired focaccia
Preheat the oven to 180°C (356°F), and once it’s fully heated, bake your fluffy donut focaccia for about 23 to 25 minutes, or until the top is beautifully golden brown.
Keep in mind that all ovens work a bit differently, so it’s a good idea to check on it at the 20-minute mark

glaze
While your focaccia with donut dough is baking, take the opportunity to prepare the glaze.
Sift the powdered sugar into a mixing bowl to ensure a smooth texture, then whisk it together with milk until completely lump-free and silky.


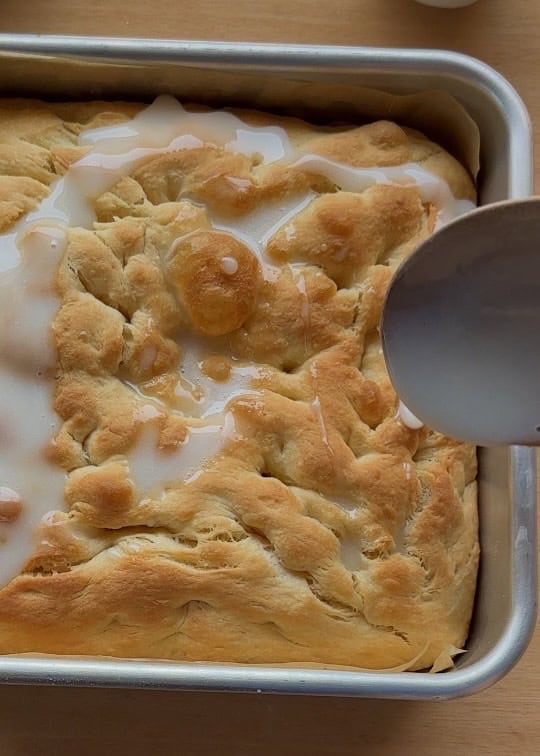
Once is baked, carefully transfer it to a cooling rack and let it rest for about 5 minutes. This short cooling time helps it set slightly while staying warm enough for the glaze to spread beautifully.
After 5 minutes, pour the glaze generously over the top, letting it naturally drip into the dimples and edges.
Allow it to rest for another 15 minutes, this will give the glaze time to harden slightly while keeping the inside super fluffy and soft, just like the perfect donut-inspired focaccia should be.

Homemade Glazed Donut Focaccia
- Prep Time: 40 minutes
- Proofing times: 2h 45 minutes
- Cook Time: 25 min
- Total Time: 0 hours
- Yield: 6 to 9
- Method: Baked
Ingredients
Yeast mixture
- 55 grams warm water
- 1 1/2 teaspoons of active dry yeast
- 2 tablespoons granulated sugar
dough
- 145 grams all purpose flour
- 50 grams granulated sugar
- 50 grams milk
- 1 egg
- 40 grams room temperature butter
butter to cover to focaccia
- 50 grams melted butter
glaze
- 120 grams powdered sugar
- 41 grams milk
Instructions
-
In a mixing bowl, combine warm water, granulated sugar, and active dry yeast. Mix well and let it sit for 10 minutes.
-
Once the yeast mixture is bubbly, add the egg and milk. Mix until well combined.
-
Add all-purpose flour, granulated sugar, and room temperature butter. Mix until incorporated.
-
Knead the dough in a stand mixer on medium-low speed for about 15 minutes.
-
Transfer the dough to a bowl, cover with plastic wrap, and proof at 28°C (82°F) for about 2 hours or until doubled in size.
-
Once proofed, pour the dough into a prepared square pan using a spatula. Drizzle generously with melted butter.
-
Use your fingers to gently press dimples into the surface of the dough.
-
Proof again for about 45 minutes at 28°C (82°F).
-
Dimple the dough again carefully and pour any remaining melted butter on top.
-
Preheat the oven to 180°C (356°F). Bake the focaccia for 23–25 minutes, checking at the 20-minute mark.
-
While it bakes, prepare the glaze by sifting powdered sugar and whisking it with milk until smooth.
-
Once baked, transfer the focaccia to a cooling rack and let it rest for 5 minutes.
-
Pour the glaze over the warm focaccia and let it sit for 15 minutes to set.
Notes
- Sticky dough is good: It’s supposed to be very sticky—don’t add more flour. That’s what makes this a pillowy donut focaccia.
- Use a stand mixer: It handles the sticky dough easily and gives better structure.
- Re-dimple after second proof: This keeps the focaccia texture even and airy.
- Let the glaze set: Rest 15 minutes after glazing so your donut bread with glaze has a perfect finish.
Best Tips To Make a glazed donut focaccia
- The dough is supposed to be very sticky: This is not a mistake—it’s exactly what gives your pillowy donut focaccia its soft, airy texture. Do not add extra flour. Sticky dough = fluffy, melt-in-your-mouth result. Trust it.
- Use a stand mixer for kneading: Because the dough is very wet and sticky, a stand mixer helps knead it thoroughly without the temptation to alter its texture. It does the work for you and ensures the structure of the dough stays perfect.
- Let the glaze set: after baking and cooling for 5 minutes, pour the glaze over the focaccia and let it rest for 15 minutes. This gives the glaze time to slightly harden, adding a shiny finish and balancing the soft, warm interior with a sweet coating.
- Don’t skip the second dimple step: After the second proof, gently re-dimple the dough with your fingers before baking. This helps create the signature focaccia texture while still preserving the soft structure of this donut bread with glaze.
FAQ about: sweet focaccia
It’s supposed to be! This recipe uses a soft, enriched dough to create that signature pillowy donut focaccia texture. Don’t add extra flour—knead with a stand mixer for best results.
Use all-purpose flour for the best balance of softness and structure.
If your yeast doesn’t bubble, your dough won’t rise. Common issues include expired yeast, water that’s too hot or too cold, or yeast that’s been exposed to air too long. Always test yeast freshness first before continuing.
Make sure your oven is fully preheated to 180°C (356°F)
ARCHER'S FOOD
Easy and delicious recipes


i know the website said the dough was supposed to be sticky, but when i made this my dough was practically still a paste. i just added a little more flour until it had a similar texture to the picture. i baked it and it tasted good though