
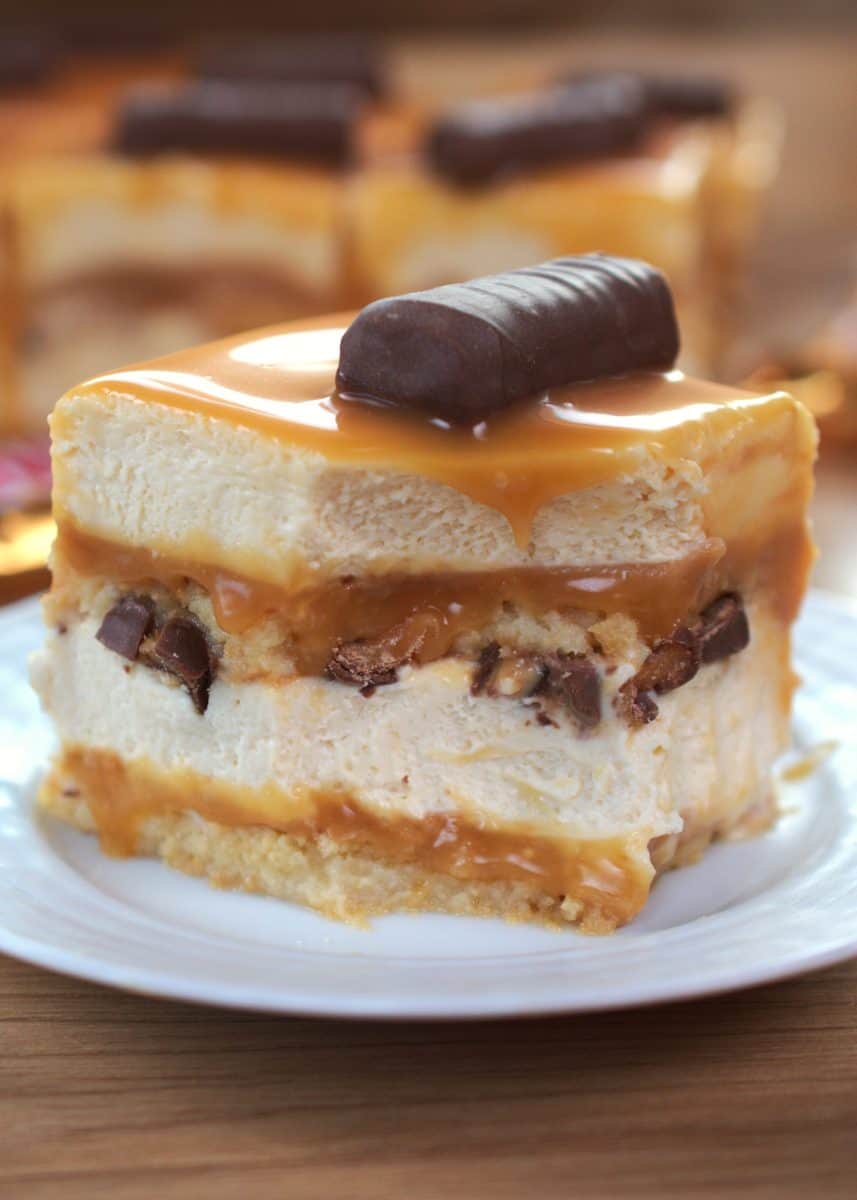
Twix tiramisu
An easy and creamy Twix tiramisu. Inspired by your favorite chocolate bars, this tiramisu features layers of soaked ladyfingers, caramel, tiramisu filling, and pieces of the famous Twix.
If you have never heard of Twix, it is a chocolate candy made with a crunchy biscuit base, caramel, and a milk chocolate coating. It’s delicious and the perfect inspiration for so many desserts.
This Twix recipe doesn’t have any coffee, gelatin, or egg. It makes it the perfect treat for everyone.
This Twix tiramisu is
- SUPER creamy and rich.
- It has different layers, different flavors, and textures.
- A delicious homemade caramel that is so easy to prepare.

Ingredients you will need to prepare this caramel tiramisu
We are using the same base ingredients for our Kinder tiramisu, Biscoff tiramisu, and Ferrero tiramisu.
- Ladyfingers: they’re the base of the tiramisu, soaked in a delicious mixture; they are soft and delicious. You can find them at grocery stores or online.
- Mascarpone cheese: very similar to cream cheese in texture, it is slightly thicker and has a stronger flavor. It is used for so many tiramisu recipes, like our traditional tiramisu.
- Cream cheese: since this recipe doesn’t use eggs, we will need the cream cheese to balance the texture and have a perfectly creamy tiramisu.
- Milk: We will create a mixture of caramel and milk to soak the ladyfingers, which is sweet and delicious.
- Sugars: we are using powdered sugar and granulated sugar. Both for different steps in the recipe.
- Heavy whipping cream: it needs to be one with at least 35% fat content.
- Butter: to prepare our caramel.
- Twix: what’s a Twix tiramisu without using any of it for this recipe?
How to make a Silky Caramel
Preparing caramel sauce can be a little intimidating sometimes, and I get it because I used to avoid preparing any recipe that requires me to prepare caramel.
I finally got the courage to prepare caramel. We tried different methods, and we ended up creating the one that worked best for us, no seizing, and that has a silky-smooth texture.
We used the same method in our caramel tiramisu and caramel Biscoff cheesecake.
Start by having all of your ingredients weighed and ready. We use granulated sugar, heavy whipping cream, and butter.

Have your tools ready: a large light-colored pan, a whisk, a spatula, and a sieve.
In a pan, start melting your sugar, and do it on medium-low heat. Once the sugar is all melted, it will be slightly caramelized. That’s when you turn off the stove and add the butter. Put it back on the stove and mix it, then add the cream. Cook it slightly (less than 1 minute) until it has a nice silky texture; if cooked for too long, it will separate the caramel from the fat.
I like to pass it through a sieve to remove any lumps or imperfections. Cover it with plastic wrap, touching the caramel; this is very important so it doesn’t create a dry top layer.
The caramel takes some time to get thicker. Caramel sauce can be stored in the fridge for 2-3 weeks.
How to assemble a Twix tiramisu
We are following the same assembling pattern we did for our pistachio tiramisu or Oreo tiramisu.
Start with a layer of soaked ladyfingers. Top it with the homemade caramel sauce and half of the tiramisu filling. We will chop some Twix candies and sprinkle them over the tiramisu layer.


Another layer of soaked ladyfingers, caramel sauce, and the rest of the tiramisu filling. Smooth it out, and all we will have to do next is decorate with caramel after the tiramisu sets.
Best tips to make a layered caramel tiramisu
- When we work the cream cheese-mascarpone cheese we are using a spatula or hard wooden spatula. We don’t want to use a whisk as it will make a very liquidy filling.
- Pass the caramel through a sieve so it’s smoother. It removes imperfections and lumps.
- Don’t over-soak the ladyfingers, or they become soggy and too soft.
- Refrigerate the tiramisu for at least 8 hours, best overnight. This is essential for a stable structure.
How to fix overwhipped cream
When you whip cream, you need to keep 3 things in mind.
The cream needs to have a high fat percentage; you can’t whip a low-fat cream.
Use a very clean bowl to whip the cream.
It needs to be dry and cold.

Accidentally over-whipping cream is something that happens to so many of us. You get distracted for just one second, and the cream went from soft to stiff peaks when you needed them to be medium-soft.
Did you know you can fix that? The only stage you can’t fix is when the liquid has separated from the fat; that’s when I recommend you just continue and make butter.
Option. Add a large splash of cold, unwhipped cream and, using a spatula, gently fold it. Depending on the texture you are looking for, you will need more cream or less.
Option. Warm up about ¼ part of the over-whipped cream until it’s fully melted. Pour this melted cream over the over-whipped cream and gently fold it. You might need to add slightly more depending on the stage the cream is at and where you want it to be.
Keep in mind that over-whipped heavy whipping cream has a higher chance of you over-whipping it again after you fix it; that’s why you need to be very gentle with the technique. We talked about this in our brownie-bottom Nutella cheesecake and vanilla Biscoff cheesecake bars recipe.

Tools you will need
The list of tools we will need is short; some of the same tools we are using for this recipe are the same for our Nutella tiramisu dessert, happy hippo tiramisu, or our Raffaello tiramisu.
- Light colored pan, needed to prepare our caramel.
- Whisk, to whisk the caramel.
- Stand mixer, to whip the cream until medium-softer peaks.
- Mixing bowl, to prepare the tiramisu filling.
- Spatula, to fold in the mixture and to scrape the bowl.
- Square pan to prepare the tiramisu, we used one with a detachable bottom for easy and clean removal.
- Sieve, for the caramel.
If you don’t have a pan with a removable bottom, you can use a normal square pan and line it with two layers of thick parchment paper to easily lift it.
It’s very important that the parchment paper is very thick and of good quality, so it doesn’t melt and break when you try to lift it. It has happened to us so many times, and it’s really annoying.
How to decorate a Twix dessert
The decoration is simple but lovely. We always decorate our no-bake desserts like our Nutella cheesecake or vanilla Biscoff cheesecake, after they have set in the fridge overnight. This makes the whole process easier and more effective.
We will slightly warm up the caramel sauce we made and let it cool slightly. That’s because we need the caramel sauce to be slightly melty but not too hot.
Pour the caramel sauce over the tiramisu and let it set for 2 hours. Yes, 2 hours.
Cut Twix bars in half and add them on top of the tiramisu; we are using 9 pieces, one per serving.

How to store a Twix tiramisu
An important question so many people have is, for how long can I store my Twix tiramisu, and how can I do it?
Any dessert that contains dairy needs to be stored in the fridge. If stored outside, it will melt, and also would not be safe to consume as it would go bad.

Most of our tiramisu recipes, like our tiramisu cheesecake, Ferrero-inspired or strawberry Biscoff tiramisu, follow the same rules for storing.
Slice your Twix tiramisu into 9 servings. If you want exact servings, you can measure them, but it’s not necessary. If you are using a square pan with a detachable bottom, the tiramisu will probably leak; that’s why I recommend you store it in a container. It is safe for up to 3-4 days.
For long-term storage, you can freeze it.
Best Twix tiramisu freezing tips
You can easily freeze a Twix tiramisu. First, slice it into 9 recommended portions and place it in a lined tray with parchment paper; the parchment paper is for easy removal and avoiding any breakage.
Freeze the tiramisu for 4 hours and then transfer it to a container. Since we pre-froze it earlier, we don’t need to worry about them sticking to each other. Make sure to add the name and date of the day you made it, so it can stay in the freezer for up to 3 months.
Whenever you need it, just thaw it in the fridge overnight and enjoy.
Q: What do you prefer, tiramisu or cheesecake?
PS. Love our recipes? The best way to support us is by leaving a comment with a review.
Print
Twix tiramisu
A delicious and creamy Twix caramel, with layers of delicious caramel sauce, tiramisu filling, Twix pieces, and soaked ladyfingers.
- Total Time11 hours
- Yield9 servings
- DietVegetarian
Ingredients
CARAMEL SAUCE
- 2 cups (400 g) granulated sugar
- ½ cup (120 g) unsalted cold butter
- ½ cup + 2 tbsp (200 ml) heavy whipping cream
- 1/4 tsp salt
MILK MIXTURE
- 3 tbsp prepared caramel sauce
- 2/3 cups (150 ml) milk
TIRAMISU FILLING
- Slightly under 1 cup (230 ml) heavy whipping cream
- ¾ cup (100 g) powdered sugar
- 1 2/3 cups (400 g) mascarpone cheese, room temperature
- ½ cup (120 g) cream cheese, room temperature
- 7 tbsp (100 g) prepared caramel sauce
ASSEMBLING
- 14 ladyfingers
- 3 tbsp caramel sauce
- 5 Twix bars
- 14 ladyfingers
- 3 tbsp caramel sauce
Instructions
- Start by preparing the caramel sauce. In a light-colored pan, melt 2 cups (400 g) granulated sugar, stir with a silicone spatula until it has all mostly melted; it’s okay if there are sugar lumps. The sugar will have a caramelized color. Turn off the stove and add ½ cup (120 g) unsalted cold butter, and bring it back on the stove on the lowest heat setting, mixing until almost all incorporated. Add ½ cup + 2 tbsp (200 ml) heavy whipping cream and continue mixing until it has some consistency, which can take about 1-2 minutes. Add 1/4 tsp salt and mix.
- Pass the caramel mixture through a sieve to remove all the unnecessary lumps, cover with plastic wrap, and let it cool at room temperature.
- For the milk mixture, warm up 3 tbsp of the prepared caramel mixture with 2/3 cup (150 ml) milk until it’s all incorporated.
- Prepare the tiramisu mixture. In a stand mixer, whip together slightly under 1 cup (230 ml) heavy whipping cream with ¾ cup (100 g) powdered sugar. Use the whisk attachment and whip until medium-soft peaks.
- In a mixing bowl, work 1 2/3 cups (400 g) room temperature mascarpone cheese with ½ cup (120 g) room temperature cream cheese. You need the mixture to be creamy, soft, and lump-free. Add 7 tbsp (100 g) of the prepared caramel sauce.
- To this mixture, add the whipped cream and fold it with a silicone spatula.
- Assemble the tiramisu. Soak 14 ladyfingers in the milk mixture and place them at the bottom of an 8-inch (20 cm) square pan with a removable bottom. Soak the ladyfingers one at a time to avoid sogginess. Add 3 tbsp of the prepared caramel over the ladyfingers. Spread half of the tiramisu filling and smooth it out. Chop 5 Twix bars and spread them over the smooth layer.
- Add another layer of 14 soaked ladyfingers, 3 tbsp of caramel sauce, and the rest of the tiramisu filling. smooth it out and refrigerate for at least 8 hours, best overnight.
- To decorate the tiramisu, melt the rest of the caramel sauce, let it cool slightly, just so it’s not too hot. Pour it over the tiramisu and tilt the pan so it spreads all over the top layer. Refrigerate for 2 hours, so it has time to harden. Grab 5 pieces of Twix and cut them in half. Place 9 of the pieces to decorate. Serve cold and enjoy!
Notes
Overcooking the caramel results in the fat separating from it.
- Prep Time: 1 hour
- Chill time: 10 hours
- Category: Dessert
- Method: no oven
- Cuisine: American
ARCHER'S FOOD
Easy and delicious recipes


Thank you for sharing a twix recipe I’ll make it today for my friendsss! 😻😻😻
Hi Nita! I hope your friends love it!
i just ovulated
Loll